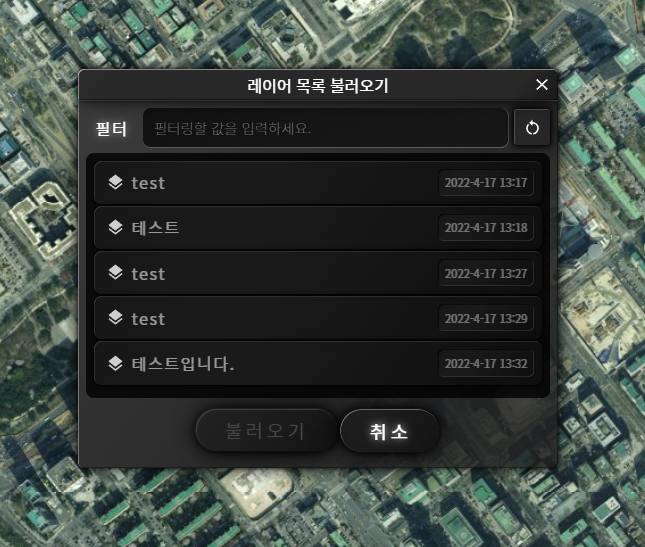
다음과 같은 UI 구성을 목표라고 할때…

대화상자 형태의 레이아웃이므로 gwcCreateModalDialog API를 이용한 클래스를 작성합니다.
class DownloadLayerList {
    constructor() {
        const dlg = gwcCreateModalDialog("레이어 목록 불러오기");
        dlg.content = `
            <div class="download-layer-list-dialog h-center content">
                <div class="vertical-linear-layout">
                    <div class="horizontal-linear-layout v-center">
                        <gwc-label content="필터" outline-type="none"></gwc-label>
                        <gwc-textinput hint="필터링할 값을 입력하세요."></gwc-textinput>
                        <gwc-toolbutton class="refresh" icon="../images/reset.svg"></gwc-toolbutton>
                    </div>
                    <gwc-vscrollview>
                        <content>
                            <gwc-tree></gwc-tree>
                        </content>
                    </gwc-vscrollview>
                    <div class="horizontal-linear-layout h-center v-space">
                        <gwc-button class="btnConfirm" title="불러오기" disabled=true></gwc-button>
                        <gwc-button class="btnCancel" title="취소"></gwc-button>
                    </div>
                </div>
            </div>
        `;

        dlg.show();
        GeoServiceWebComponentManager.instance.update();

        ....
대화상자의 크기 조정이 필요하다면 아래의 코드를 추가합니다.
        dlg.width = "30em"
        dlg.resizablePanel.resizableLeft = true;
        dlg.resizablePanel.resizableRight = true;
        dlg.resizablePanel.resizableTop = true;
        dlg.resizablePanel.resizableBottom = true;
        dlg.resizablePanel.minWidth = 350;
        dlg.resizablePanel.minHeight = 300;
        dlg.resizablePanel.addEventListener("change", (event) => {
            const { mode, oldHeight, newHeight } = event.detail;
            if(mode === "BOTTOM" || mode == "TOP") {
                const vscrollview = dlg.content.querySelector("gwc-vscrollview");
                const height = parseFloat(window.getComputedStyle(vscrollview).getPropertyValue("height"));
                vscrollview.style.height = `${height - (oldHeight - newHeight)}px`;
                vscrollview.refresh();
            }
        });
    }

    ....
CSS에 대한 코드는 다음과 같습니다.
.download-layer-list-dialog {
    padding: 0.5em;
}

.download-layer-list-dialog gwc-textinput {
    flex: 1; /* 대화상자의 가로 크기를 재조정 했을 때 gwc-textinput의 크기도 재조정됨  */
}

.download-layer-list-dialog gwc-vscrollview {
    position: relative;
    height: 16em;
    background: rgba(0,0,0,0.8);
    border-radius: 0.5em;
    overflow: hidden;
}

.download-layer-list-dialog gwc-tree {
    width: 100%; /* tree의 항목의 크기를 대화상자의 폭을 가득 채우도록 조정함 */
    padding: 0.5em 0.5em 0.5em 0.5em;
}

.download-layer-list-dialog gwc-tree .gwc-tree-folder-files-file {
    width: 100%;
}
끝으로 gwc의 tree 컴포넌트는 동일한 계층에 동일한 이름을 가진 항목을 추가할 수 없습니다. 이때 label 속성을 이용해 이름은 다르지만 표시되는 제목은 중복되게 변경해 줄 수 있습니다. 코드 예시는 다음과 같습니다.
data.forEach(item => {
    const rootFolder = this.#tree.rootFolder;
    const file = rootFolder.addFile(item.id, "url(../images/layers.svg)");

    const date = new Date(item.used_time);
    file.tag = `${date.getFullYear()}-${date.getMonth()+1}-${date.getDate()} ${date.getHours()}:${date.getMinutes()}`;
    file.label = item.title;
});
