[GoF] Visitor 패턴

패턴명칭

Visitor

필요한 상황

데이터와 이 데이터의 처리를 분리하여 구현하고자 할때 사용되는 패턴입니다. 데이터는 Composite 패턴으로 구현되므로 집합을 구성하는 단일 요소 역시 집합으로 저장될 수 있습니다. 이러한 집합에 대한 집합으로 구성된 데이터를 처리하는 로직을 독립적으로 구현할 수 있습니다.

예제 코드
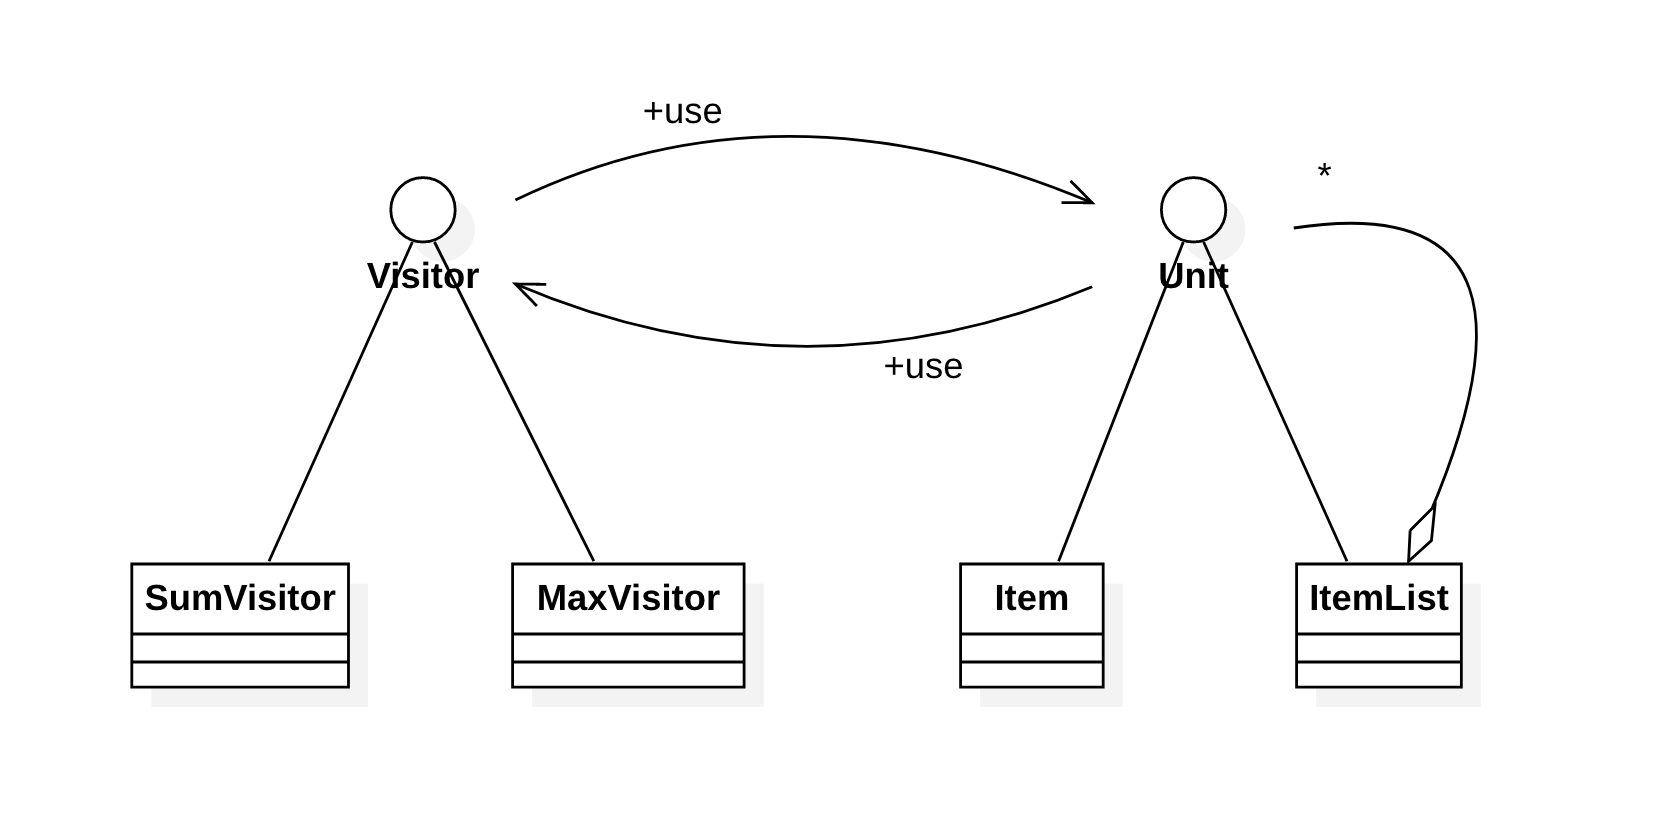
Visitor 인터페이스는 데이터를 처리하는 클래스가 구현해야할 공통 인터페이스입니다. 코드는 다음과 같습니다.

package tstThread;

public interface Visitor {
	void visit(Unit unit);
}

이 Visitor를 구현하는 클래스로는 SumVisitor, MaxVisitor과 위의 클래스 다이어그램에는 표시되어 있지 않지만 MinVisitor, AvgVisitor이 있습니다. 이 네 클래스는 각각 데이터의 총합 계산, 데이터 중 최대값 파악, 데이터 중 최소값 파악, 데이터의 평균값 계산입니다. 데이터는 Unit 인터페이스를 구현해야 하며 코드는 다음과 같습니다.

package tstThread;

public interface Unit {
	void accept(Visitor visitor);
}

이 Unit 인터페이스를 구현하는 Item에는 하나의 정수값이 저장되며 ItemList는 여러개의 Unit 객체를 담을 수 있습니다. 먼저 Item 클래스는 다음과 같습니다.

package tstThread;

public class Item implements Unit {
	private int value;
	
	public Item(int value) {
		this.value = value;
	}
	
	public int getValue() {
		return value;
	}
	
	@Override
	public void accept(Visitor visitor) {
		visitor.visit(this);
	}
}

ItemList 클래스는 다음과 같습니다.

package tstThread;

import java.util.ArrayList;
import java.util.Iterator;

public class ItemList implements Unit {
	private String name;
	
	private ArrayList<Unit> list = new ArrayList<Unit>();
	
	public ItemList(String name) {
		this.name = name;
	}
	
	public String getName() {
		return this.name;
	}
	
	public void add(Unit unit) {
		list.add(unit);
	}
	
	@Override
	public void accept(Visitor visitor) {
		Iterator<Unit> iter = list.iterator();
		
		while(iter.hasNext()) {
			Unit unit = iter.next();
			visitor.visit(unit);
		}
	}
}

이제 이러한 데이터를 처리하는 Visitor 인터페이스의 구현 클래스를 살펴보겠습니다. 먼저 SumVisitor 클래스입니다.

package tstThread;

public class SumVisitor implements Visitor {
	private int sum = 0;
	
	public int getValue() {
		return sum;
	}
	
	@Override
	public void visit(Unit unit) {
		if(unit instanceof Item) {
			sum += ((Item)unit).getValue();
		} else {
			unit.accept(this);			
		}
	}
}

다음은 MaxVisitor 클래스입니다.

package tstThread;

public class MaxVisitor implements Visitor {
	private int max = Integer.MIN_VALUE;
	private String name = null;
	private String visitedName = null;
	
	public int getValue() {
		return max;
	}
	
	public String getName() {
		return name;
	}
	
	@Override
	public void visit(Unit unit) {
		if(unit instanceof Item) {
			int value = ((Item)unit).getValue();
			if(value > max) {
				max = value;
				name = visitedName;
			}
		} else {
			visitedName = ((ItemList)unit).getName();
			unit.accept(this);			
		}
	}
}

다음은 MinVisitor 클래스입니다.

package tstThread;

public class MinVisitor implements Visitor {
	private int min = Integer.MAX_VALUE;
	private String name = null;
	private String visitedName = null;
	
	public int getValue() {
		return min;
	}
	
	public String getName() {
		return name;
	}
	
	@Override
	public void visit(Unit unit) {
		if(unit instanceof Item) {
			int value = ((Item)unit).getValue();
			if(value < min) {
				name = visitedName;
				min = value;
			}
		} else {
			visitedName = ((ItemList)unit).getName();
			unit.accept(this);			
		}
	}
}

다음은 AvgVisitor 클래스입니다.

package tstThread;

public class AvgVisitor implements Visitor {
	private int sum = 0;
	private int count = 0;
	public double getValue() {
		return sum / count;
	}
	
	@Override
	public void visit(Unit unit) {
		if(unit instanceof Item) {
			sum += ((Item)unit ).getValue();
			count++;
		} else {
			unit.accept(this);			
		}
	}
}

지금까지의 클래스를 사용하는 예제 코드는 다음과 같습니다.

package tstThread;

public class Main {
	public static void main(String[] args) {
		ItemList root = new ItemList("root");
		root.add(new Item(10));
		root.add(new Item(20));
		root.add(new Item(40));
		
		ItemList subList1 = new ItemList("sub1");
		subList1.add(new Item(5));
		subList1.add(new Item(16));
		subList1.add(new Item(36));
		
		ItemList subList2 = new ItemList("sub2");
		subList2.add(new Item(50));
		subList2.add(new Item(70));
		
		ItemList subList3 = new ItemList("sub2-sub");
		subList3.add(new Item(8));
		subList3.add(new Item(21));
		subList3.add(new Item(37));
		
		root.add(subList1);
		root.add(subList2);
		subList2.add(subList3);
		
		SumVisitor sum = new SumVisitor();
		root.accept(sum);
		System.out.println("Sum: " + sum.getValue());
		
		MaxVisitor max = new MaxVisitor();
		root.accept(max);
		System.out.println("Max: " + max.getValue() + " @" + max.getName());
		
		MinVisitor min = new MinVisitor();
		root.accept(min);
		System.out.println("Min: " + min.getValue() + " @" + min.getName());
		
		AvgVisitor avg = new AvgVisitor();
		root.accept(avg);
		System.out.println("Avg: " + avg.getValue());
	}
}

실행 결과는 다음과 같습니다.

Sum: 313
Max: 70 @sub2
Min: 5 @sub1
Avg: 28.0
이 글은 소프트웨어 설계의 기반이 되는 GoF의 디자인패턴에 대한 강의자료입니다. 완전한 실습을 위해 이 글에서 소개하는 클래스 다이어그램과 예제 코드는 완전하게 실행되도록 제공되지만, 상대적으로 예제 코드와 관련된 설명이 함축적으로 제공되고 있습니다. 이 글에 대해 궁금한 점이 있으면 댓글을 통해 남겨주시기 바랍니다.

[GoF] Interpreter 패턴

패턴명칭

Interpreter

필요한 상황

프로그램의 실행 상황을 제어할 수 있는 스크립트 언어를 지원할 수 있는 패턴이다.

예제 코드

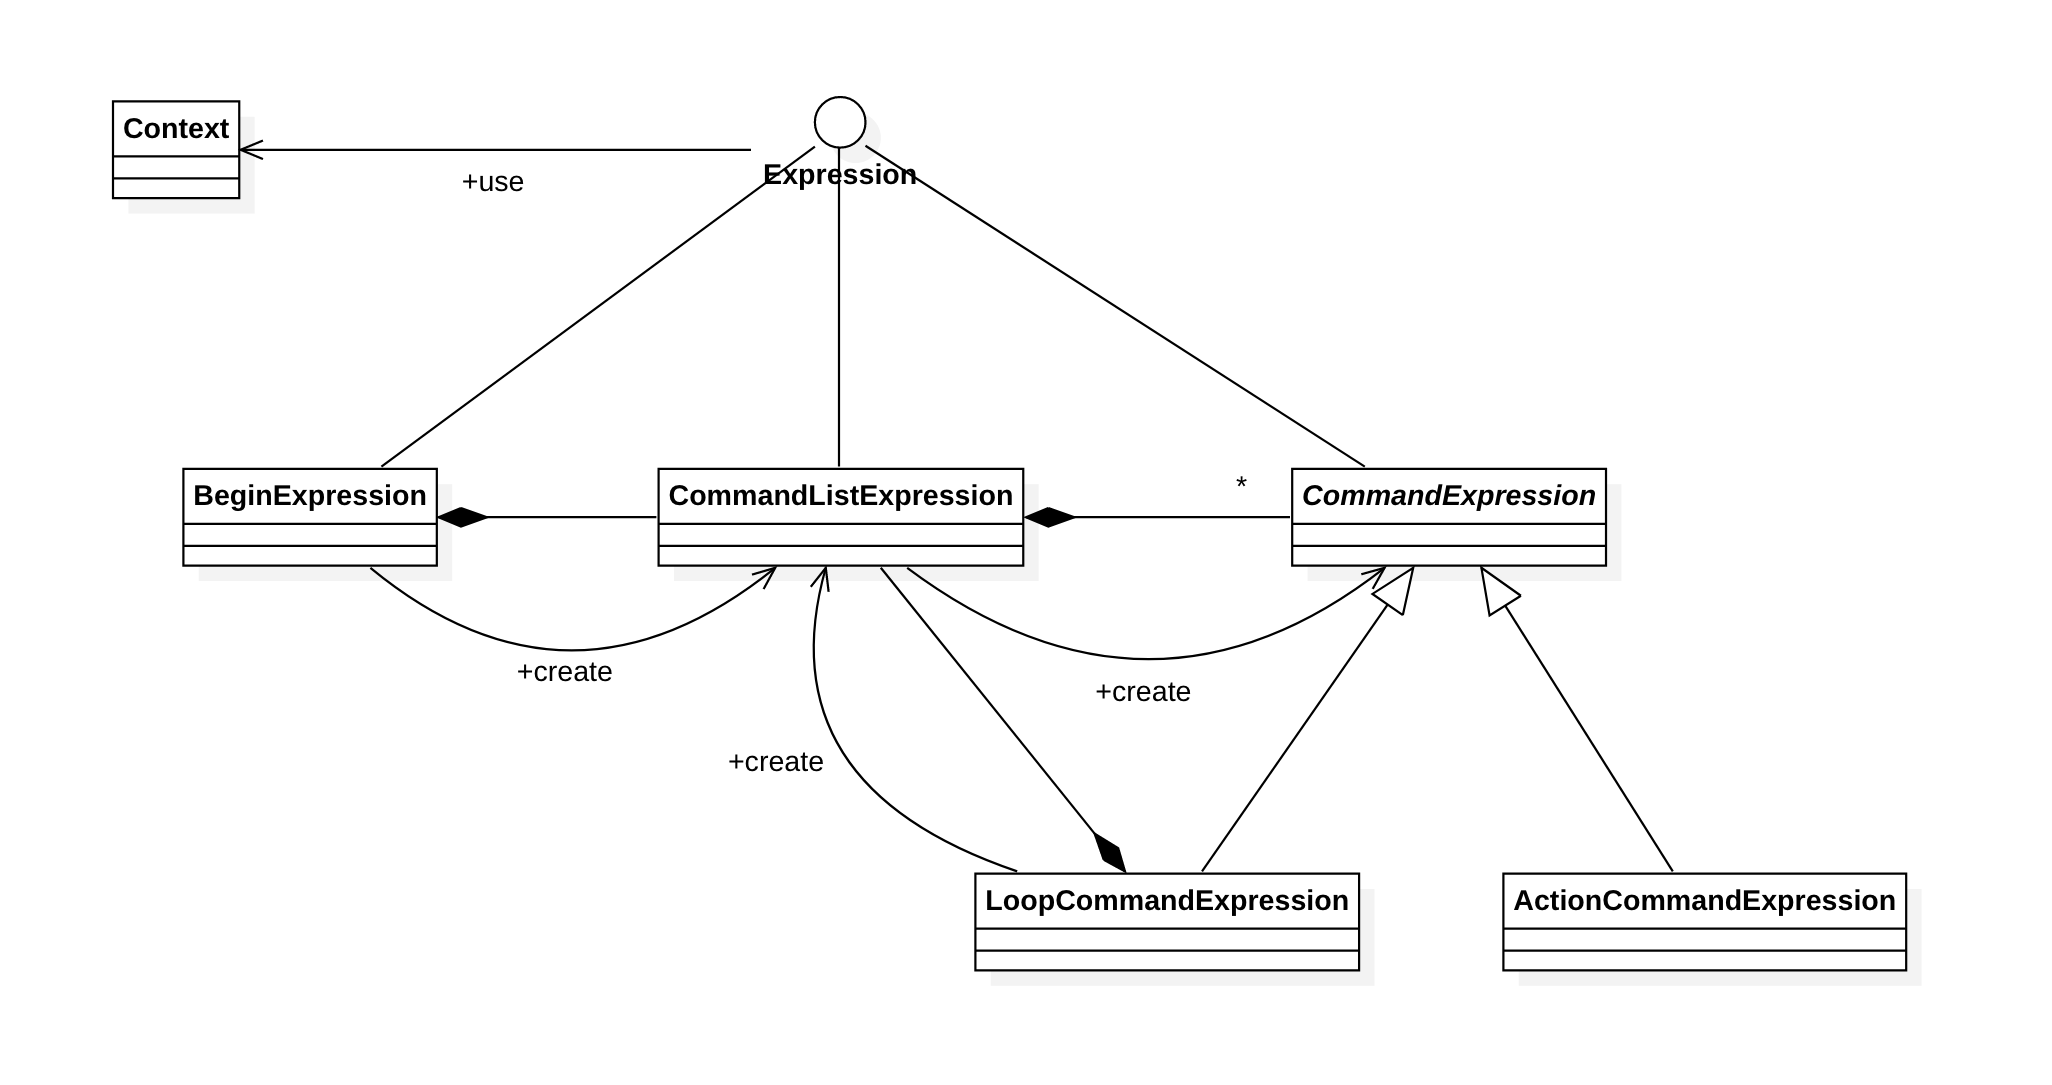
어떤 객체를 상(Front), 하(Back), 좌(Left), 우(Right)로 이동시키는 명령어로써 각각 FRONT, BACK, LEFT, RIGHT를 사용하고 이러한 명령어들의 조합을 반복할 수 있는 LOOP 명령어를 사용할 수 있는 스크립트 언어를 해석하기 위한 예제이다. Context는 스크립트에 대한 문자열을 받아 처리하는 클래스이고, Expression은 명령어들의 해석하고 처리하기 위한 클래스들이 구현해야 하는 인터페이스이다. 먼저 Context 클래스는 다음과 같다.

package tstThread;

import java.util.StringTokenizer;

public class Context {
	private StringTokenizer tokenizer;
	private String currentKeyword;

	public Context(String script) {
		tokenizer = new StringTokenizer(script);
		readNextKeyword();
	}

	public String readNextKeyword() {
		if(tokenizer.hasMoreTokens()) {
			currentKeyword = tokenizer.nextToken();
		} else {
			currentKeyword = null;
		}
		
		return currentKeyword;
	}
	
	public String getCurrentKeyword() {
		return currentKeyword;
	}
}

Expression 인터페이스는 다음과 같다.

package tstThread;

public interface Expression {
	boolean parse(Context context);
	boolean run();
}

parse 매서드는 스크립트를 해석하고, run은 해석된 스크립트를 실제로 실행하는 매서드이다. 스크립트의 예제로 다음 문자열을 사용한다.

BEGIN FRONT LOOP 3 LOOP 2 RIGHT FRONT END LOOP 3 LEFT END BACK RIGHT END BACK END

스크립트는 BEGIN으로 시작해서 END로 끝나며, 반복문인 LOOP는 반복 회수로 시작해서 반복할 명령어들로 구성되고 END로 끝난다.

Expression 인터페이스를 구현하는 클래스들을 살펴보자. 먼저 스크립트의 시작을 해석하는 BeginExpression이다.

package tstThread;

public class BeginExpression implements Expression {
	private CommandListExpression expression;

	@Override
	public boolean parse(Context context) {
		if(checkValidKeyword(context.getCurrentKeyword())) {
			context.readNextKeyword();
			expression = new CommandListExpression();
			return expression.parse(context);
		} else {
			return false;
		}
	}

	public String toString() {
		return "BEGIN " + expression; 
	}

	@Override
	public boolean run() {
		return expression.run();
	}

	public static boolean checkValidKeyword(String keyword) {
		return keyword.equals("BEGIN");
	}
}

다음은 CommandListExpression 이다.

package tstThread;

import java.util.ArrayList;
import java.util.Iterator;

public class CommandListExpression implements Expression {
	private ArrayList<CommandExpression> commands = new ArrayList<CommandExpression>();
	
	@Override
	public boolean parse(Context context) {
		while(true) {
			String currentKeyword = context.getCurrentKeyword();
			if(currentKeyword == null) {
				return false;
			} else if(currentKeyword.equals("END")) {
				context.readNextKeyword();
				break;
			} else {
				CommandExpression command = null;
				
				if(LoopCommandExpression.checkValidKeyword(currentKeyword)) {
					command = new LoopCommandExpression(currentKeyword);
				} else if(ActionCommandExpression.checkValidKeyword(currentKeyword)) {
					command = new ActionCommandExpression(currentKeyword);
				}
				
				if(command != null) {
					if(command.parse(context)) {
						commands.add(command);
					} else {
						return false;
					}
				} else {
					return false;
				}
			}
		}
		
		return true;
	}

	public String toString() {
		return commands.toString();
	}

	@Override
	public boolean run() {
		Iterator<CommandExpression> iter = commands.iterator();
		
		while(iter.hasNext()) {
			boolean bOK = iter.next().run();
			if(!bOK) return false;
		}
		
		return true;
	}
}

CommandListExpression은 실제 실행이 가능한 LOOP나 FRONT, BACK, RIGHT, LEFT 명령어를 담을 담을 수 있는 CommandExpression의 파생클래스를 생성해 주는 책임을 진다. CommandExpression의 클래스는 다음과 같다.

package tstThread;

public abstract class CommandExpression implements Expression {
	protected String keyword;
	
	public CommandExpression(String keyword) {
		this.keyword = keyword;
	}
}

CommandExpression 추상 클래스를 상속받는 클래스들을 살펴보자. 먼저 LoopCommandExpression 클래스이다.

package tstThread;

public class LoopCommandExpression extends CommandExpression {
	private int count;
	private CommandListExpression expression;
	
	
	public LoopCommandExpression(String keyword) {
		super(keyword);
	}

	@Override
	public boolean parse(Context context) {
		if(!checkValidKeyword(keyword)) return false; 
		
		String countKeyword = context.readNextKeyword();
		if(countKeyword == null) return false;
		
		try {
			count = Integer.parseInt(countKeyword);
			expression = new CommandListExpression();
			
			if(context.readNextKeyword() == null) return false;
			
			return expression.parse(context);
		} catch(NumberFormatException e) {
			return false;
		}
	}

	public String toString() {
		return "LOOP(" + count + ") " + expression;
	}

	@Override
	public boolean run() {
		for(int i=0; i<count; i++) {
			if(!expression.run()) {
				return false;
			}
		}
		
		return true;
	}
	
	public static boolean checkValidKeyword(String keyword) {
		return keyword.equals("LOOP");
	}
}

다음은 ActionCommandExpression 클래스이다.

package tstThread;

public class ActionCommandExpression extends CommandExpression {
	public ActionCommandExpression(String keyword) {
		super(keyword);
	}

	@Override
	public boolean parse(Context context) {
		if(!checkValidKeyword(keyword)) return false;
		if(context.readNextKeyword() == null) return false;
				
		return true;
	}
	
	public String toString() {
		return keyword;
	}

	@Override
	public boolean run() {
		System.out.println("cmd: " + keyword);
		return true;
	}

	public static boolean checkValidKeyword(String keyword) {
		boolean bKeywordOk = keyword.equals("FRONT") || 
				keyword.equals("BACK") || keyword.equals("LEFT") || 
				keyword.equals("RIGHT");
		
		return bKeywordOk;
	}
}

지금까지의 클래스들을 사용하는 예제는 다음과 같다.

package tstThread;

public class Main {
	public static void main(String[] args) {
		//String script = "BEGIN FRONT LOOP 2 RIGHT FRONT LEFT LEFT BACK RIGHT END BACK END";
		//String script = "BEGIN FRONT LOOP 2 RIGHT FRONT LOOP 3 LEFT LEFT END BACK RIGHT END BACK END";
		String script = "BEGIN FRONT LOOP 3 LOOP 2 RIGHT FRONT END LOOP 3 LEFT END BACK RIGHT END BACK END";
		Context context = new Context(script);
		Expression expression = new BeginExpression();
		
		System.out.println(script);
		if(expression.parse(context)) {
			System.out.println(expression);
			expression.run();
		} else {
			System.out.println("Parsing error");
		}
	}
}

실행 결과는 다음과 같다.


BEGIN FRONT LOOP 3 LOOP 2 RIGHT FRONT END LOOP 3 LEFT END BACK RIGHT END BACK END
BEGIN [FRONT, LOOP(3) [LOOP(2) [RIGHT, FRONT], LOOP(3) [LEFT], BACK, RIGHT], BACK]
cmd: FRONT
cmd: RIGHT
cmd: FRONT
cmd: RIGHT
cmd: FRONT
cmd: LEFT
cmd: LEFT
cmd: LEFT
cmd: BACK
cmd: RIGHT
cmd: RIGHT
cmd: FRONT
cmd: RIGHT
cmd: FRONT
cmd: LEFT
cmd: LEFT
cmd: LEFT
cmd: BACK
cmd: RIGHT
cmd: RIGHT
cmd: FRONT
cmd: RIGHT
cmd: FRONT
cmd: LEFT
cmd: LEFT
cmd: LEFT
cmd: BACK
cmd: RIGHT
cmd: BACK

이 글은 소프트웨어 설계의 기반이 되는 GoF의 디자인패턴에 대한 강의자료입니다. 완전한 실습을 위해 이 글에서 소개하는 클래스 다이어그램과 예제 코드는 완전하게 실행되도록 제공되지만, 상대적으로 예제 코드와 관련된 설명이 함축적으로 제공되고 있습니다. 이 글에 대해 궁금한 점이 있으면 댓글을 통해 남겨주시기 바랍니다.