three.js에서 한글 텍스트 렌더링하기

three.js에서 한글을 출력하기 위해서는 2가지 방식이 존재하는데, 첫째는 한글을 표현하는 도형에 대한 구성 좌표를 이용한 모델로 렌더링하는 방식과 둘째는 일단 표현하고자 하는 한글을 Canvas에 그린 뒤 이미지화하여 이 이미지를 사각형 모델에 텍스쳐 맵핑하는 방식이 있습니다.

이 글은 첫번째 방법에 대한 내용에 대한 코드를 설명합니다. 먼저 한글에 대한 도형을 구성하는 좌표가 필요한데 한글 폰트 파일에서 좌표를 추출하여 JSON으로 생성해 이 JSON 파일을 사용합니다. 이를 위해 TypeFace.js 사이트를 통해 원하는 결과를 얻을 수 있습니다.

이렇게 얻은 폰트의 JSON 파일을 이용해 모델을 생성하는 코드는 다음과 같습니다.

let fontLoader = new THREE.FontLoader();
fontLoader.load("Do Hyeon_Regular.json", (font) => {
    let geometry = new THREE.TextGeometry(
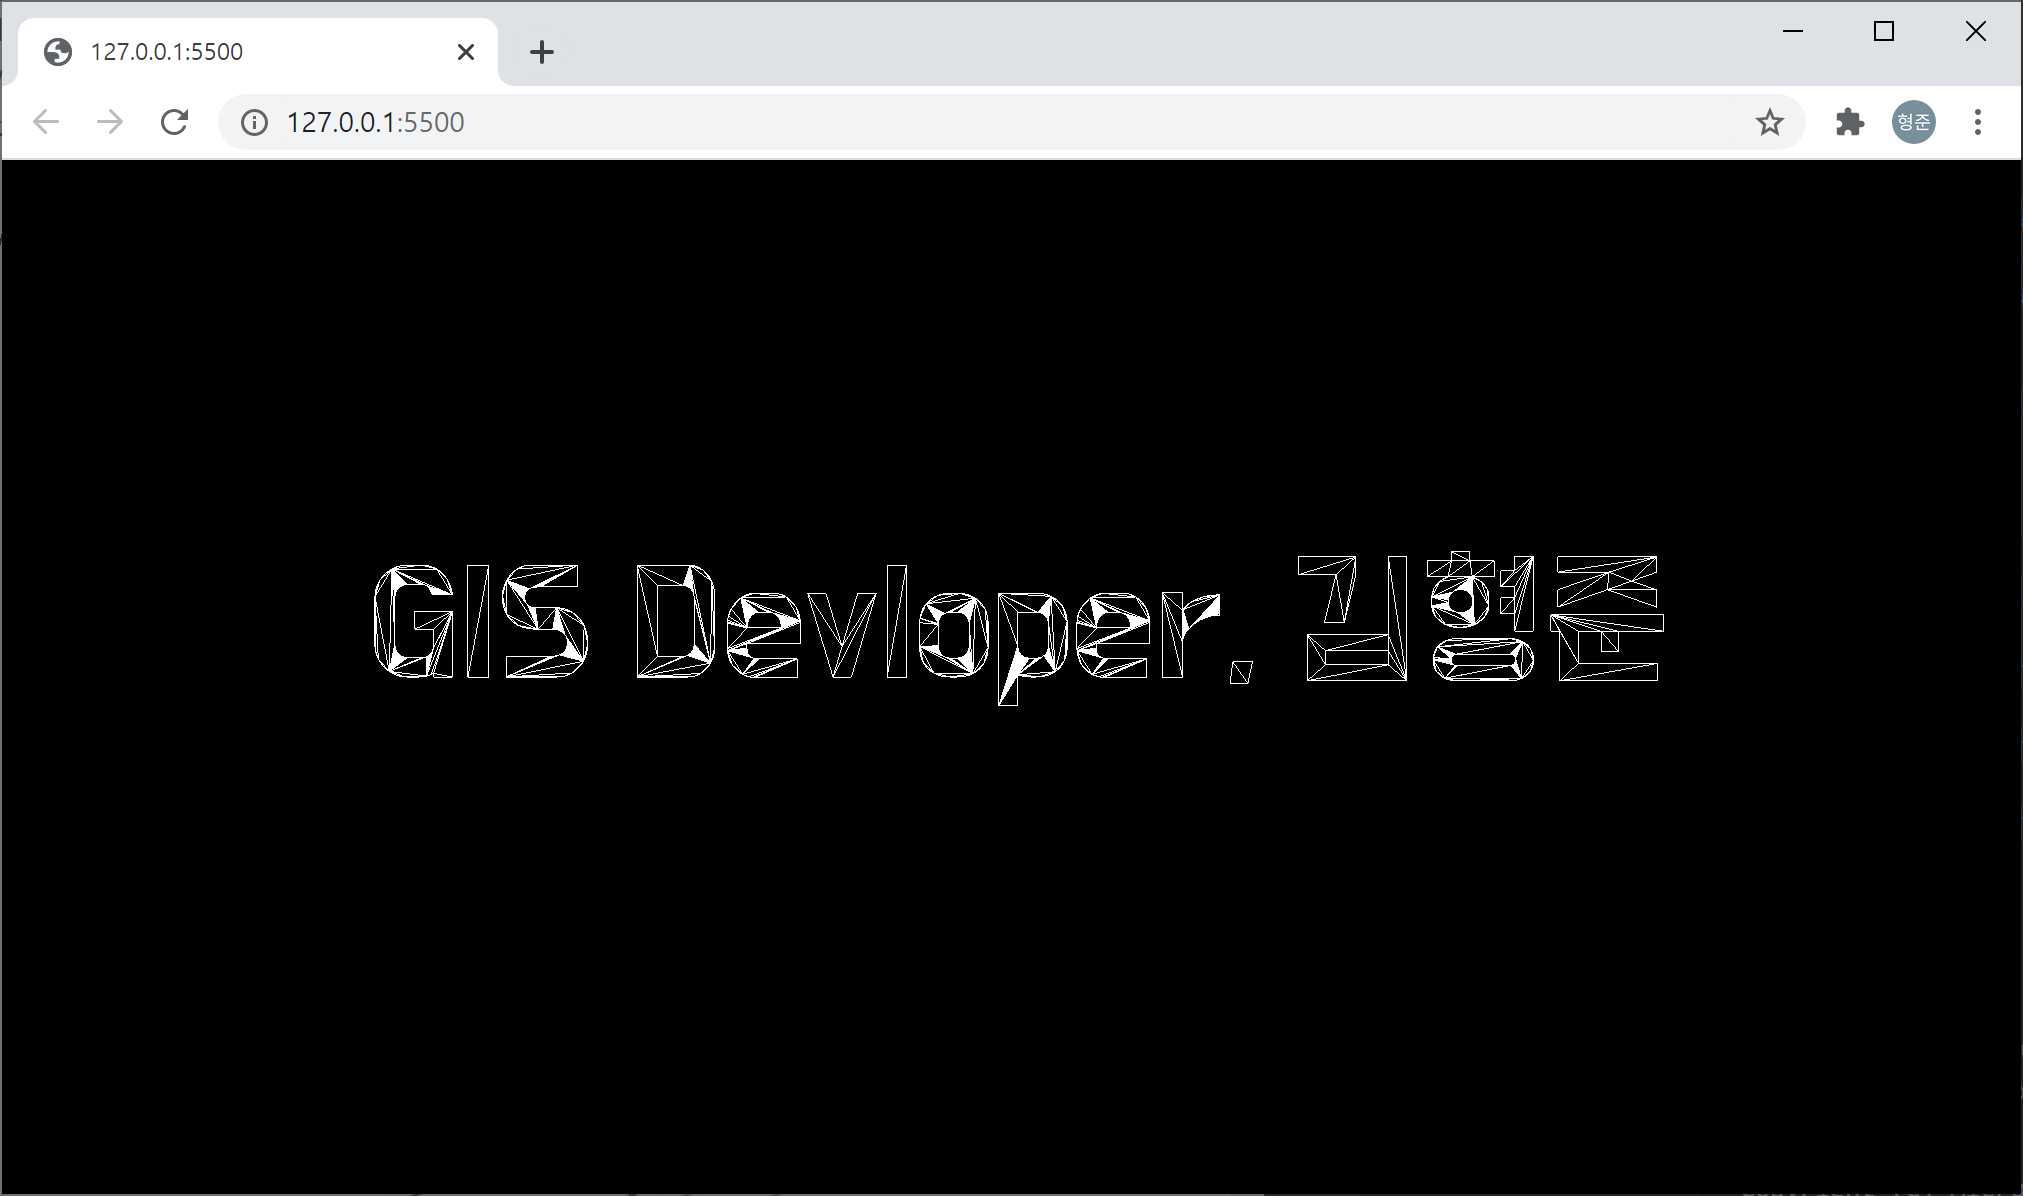
        "GIS Devloper, 김형준",
        { 
            font: font,
            size: 1,
            height: 0,
            curveSegments: 12
        }
    );

    geometry.computeBoundingBox();
    let xMid = -0.5 * ( geometry.boundingBox.max.x - geometry.boundingBox.min.x );
    geometry.translate( xMid, 0, 0 );

    let material = new THREE.MeshBasicMaterial({
        color: 0xffffff, 
        wireframe: true
    });

    let mesh = new THREE.Mesh(geometry, material);
    
    this.scene.add(mesh);

    this.mesh = mesh;

    this.render();
});

위의 코드에 대한 실행 결과는 다음과 같습니다.

위의 실행 결과를 얻기 위한 폰트 데이터 및 전체 코드를 다운로드 받을 수 있습니다.

three.js에서 폴리곤, 폴리라인 그리기

three.js에서 폴리곤(Polygon)을 렌더링하는 코드입니다. 선의 굵기에 대한 API는 지원하지만 실제로 반영되지 못하는 점이 아쉽습니다.

const starShape = new THREE.Shape();
starShape.moveTo(0, 5);
starShape.lineTo(1, 1);
starShape.lineTo(5, 0);
starShape.lineTo(1, -1);
starShape.lineTo(0, -5);
starShape.lineTo(-1, -1);
starShape.lineTo(-5, 0);
starShape.lineTo(-1, 1);

const geometry = new THREE.ShapeGeometry( starShape );
const material = new THREE.MeshBasicMaterial( { 
    color: 0x00ff00, 
    wireframe: true 
});

const mesh = new THREE.Line( geometry, material ) ;
scene.add( mesh );

this.mesh = mesh;

실행 결과는 다음과 같습니다.

다음은 폴리라인(Polyline)을 렌더링하는 코드입니다. 마찬가지로 선의 굵기 지정을 위해 값을 설정해도 굵기는 항상 1로 표현됩니다.

const points = [
    new THREE.Vector3(-10, -5, 0), // {x: -10, y: -5, z: 0},
    new THREE.Vector3(-3, 5, 0),
    new THREE.Vector3(0, 1, 0),
    new THREE.Vector3(3, 5, 0),
    new THREE.Vector3(10, -5, 0)
    ];

const geometry = new THREE.BufferGeometry()
geometry.setFromPoints(points);

const material = new THREE.LineBasicMaterial({color: 0xffff00, linewidth: 3});

const line = new THREE.Line(geometry, material);
scene.add(line);

실행 결과는 다음과 같습니다.

three.js start project 코드

자바스크립트의 모듈 기반으로 three.js를 도입하기 위한 뼈대입니다. App이라는 클래스를 하나 만들 것이고 이 App 클래스를 통해 three.js의 초기화 및 정육면체를 회전시켜 보겠습니다.

먼저 HTML 코드는 다음과 같습니다.

<!DOCTYPE html>
<html>
<head>
    <meta name="viewport" content="width=device-width, initial-scale=1">
    <link rel="stylesheet" href="style.css">
    <script type="module" src="app.js">
</head>
<body>
</body>
</html> 

DOM은 없고 css와 js 파일만을 참조하고 있습니다. DOM은 js 파일인 app.js에서 동적으로 추가해 줍니다. 먼저 css에 대한 style.css 파일의 코드는 다음과 같습니다.

* {
    outline: none;
    padding: 0;
    margin: 0;
}

3차원 출력이 웹 브라이저 전체 화면을 차지하는 경우라면 html과 css는 변경되지 않으며 모든 작업은 js 파일에서 처리됩니다. 이제 app.js 파일을 살펴보면 다음과 같습니다.

import * as THREE from 'https://cdnjs.cloudflare.com/ajax/libs/three.js/r126/three.module.min.js'

class App {
    constructor() {
        this.initialize();
        this.render();
    }

    initialize() {}
    update() {}
    render() {}
    resize() {}
}

window.onload = function() {
    new App()
}

App 클래스는 4개의 매서드를 갖습니다. initialize는 WebGL을 위한 객체 초기화 및 Mesh, Camera, 화면 크기 변경에 따른 이벤트 등록을 담당하는데 코드는 다음과 같습니다.

initialize() {
    this.domWebGL = document.createElement('div');
    document.body.appendChild(this.domWebGL);

    let scene = new THREE.Scene();
    let renderer = new THREE.WebGLRenderer();

    renderer.setClearColor(0x000000, 1.0);
    renderer.setPixelRatio(window.devicePixelRatio);
    renderer.setSize(window.innerWidth, window.innerHeight);

    this.domWebGL.appendChild(renderer.domElement);  
    window.onresize = this.resize.bind(this); 

    let cubeGeometry = new THREE.BoxGeometry(1, 1, 1);
    let cubeMaterial = new THREE.MeshNormalMaterial();
    let cube = new THREE.Mesh(cubeGeometry, cubeMaterial);

    cube.position.x = 0;
    cube.position.y = 0;
    cube.position.z = 0;

    scene.add(cube);

    let camera = new THREE.PerspectiveCamera(40, window.innerWidth / window.innerHeight, 0.1, 100);
    camera.position.x = 3;
    camera.position.y = 3;
    camera.position.z = 3;
    camera.lookAt(scene.position);
    scene.add(camera);

    this.camera = camera;
    this.renderer = renderer;
    this.scene = scene;
    this.cube = cube;
}

render 매서드는 실제 3차원 화면을 렌더링을 수행하며 애니메이션 처리를 위해 내부적으로 update를 호출합니다. 이 두 매서드는 다음과 같습니다.

update() {
    this.cube.rotation.x += 0.01;
    this.cube.rotation.y += 0.02;
}

render() {
    this.update();
    this.renderer.render(this.scene, this.camera);
    requestAnimationFrame(this.render.bind(this));

}

웹 브라우저의 크기가 변경될 때 3차원 렌더링 되는 화면 크기도 그에 맞춰 변경해줘야 합니다. 이를 위한 resize 매서드는 다음과 같습니다.

resize() {
    let camera = this.camera;
    let renderer = this.renderer;
    let scene = this.scene;

    camera.aspect = window.innerWidth / window.innerHeight;
    camera.updateProjectionMatrix();
    renderer.setSize(window.innerWidth, window.innerHeight);
    renderer.render(scene, camera);
}

실행해 보면 아래처럼 정육면체의 매쉬가 회전하는 화면을 볼 수 있습니다.

VWorld의 3D 모델 파일을 웹에서 가시화

VWorld에서 제공하는 3차원 지도 서비스가 있습니다. 3차원 지형 위에 3차원 건물을 사실감 있게 표현하고 있는 서비스입니다. 이 VWorld는 지형의 높이 데이터인 DEM과 모델 데이터를 공개하고 있습니다. 둘 중에 모델 데이터는 xdo라는 확장자를 갖는 VWorld만의 데이터 포맷으로 제공되고 있습니다.

이 xdo 파일을 웹에서 WebGL을 이용하여, 보다 정확히는 WebGL을 좀더 편리하게 사용할 수 있는 three.js를 이용하여 xdo 데이터를 해석하고 가시화 하는 기능을 구현해 보았습니다. 아래는 관련 동영상입니다.

3차원 빌딩 모델에 대한 단면 추출

VWorld에서 제공하는 xdo 파일을 통해 3차원 건물 모델에 대한 단면을 추출하는 기능에 대한 구현에 대한 실행 동영상입니다.

Web에서 3차원 가시화를 위해 three.js 라이브러리를, gui는 dat.gui 라이브러리를 사용했습니다.