
이 글의 원문은 https://opencv-python-tutroals.readthedocs.io/en/latest/py_tutorials/py_imgproc/py_contours/py_contour_features/py_contour_features.html#contour-features 입니다.
이 글에서는 등치선에서 면적, 가장자리 길이, 중심선, 바운딩 박스(Bounding Box) 등을 추출하는 내용에 대한 다양한 함수를 살펴 봅니다.
이미지에는 Moments라는 속성을 통해 객체의 무게중심점이나 면적등과 같은 몇가지 특성을 계산할 수 있습니다. 이미지 Moments에 대한 내용은 https://en.wikipedia.org/wiki/Image_moment 을 참고하기 바랍니다. 여기서 객체는 이미지에서 추출한 등치선으로 구성된 것을 의미합니다.
cv2.moments 함수가 이미지의 Moments를 계산하는데, 예제는 아래와 같습니다.
import cv2
import numpy as np

img = cv2.imread('./data/cornerTest.jpg', cv2.COLOR_BGR2GRAY)
ret,thresh = cv2.threshold(img,127,255,0)
image, contours,hierarchy = cv2.findContours(thresh, 1, 2)

cnt = contours[0]
M = cv2.moments(cnt)
print(M)
결과는 다음과 같은 이미지의 Moments 특성들이 출력됩니다.
{'m00': 58816.0, 'm10': 14851193.5, 'm01': 14810238.5, 'm20': 4092644028.833333, 'm11': 3834175447.5, 'm02': 4001879218.1666665, 'm30': 1206388074009.75, 'm21': 1075214481081.5, 'm12': 1056320648809.1666, 'm03': 1146271400880.25, 'mu20': 342678910.93272305, 'mu11': 94551573.98514414, 'mu02': 272568071.0828414, 'mu30': -69863083.65454102, 'mu21': -3088048920.343384, 'mu12': -1781659324.0393372, 'mu03': 1304351953.3330078, 'nu20': 0.09905956288466355, 'nu11': 0.027332401528683933, 'nu02': 0.07879234209158287, 'nu30': -8.327392546410929e-05, 'nu21': -0.0036808274437723507, 'nu12': -0.0021236647166352715, 'nu03': 0.0015547339404300424}
위의 값 중 m00은 객체의 넓이이고, 무게 중심점 cx, cy는 각각 m10/m00, m01/m00입니다. 객체의 넓이는 cv2.contourArea 함수를 통해서도 얻을 수 있습니다.
area = cv2.contourArea(cnt)
객체, 즉 등치선의 가장자리 길이는 다음처럼 얻을 수 있습니다.
perimeter = cv2.arcLength(cnt,True)
함수의 두번째 인자는 등치선이 폐합 여부입니다.
등치선은 매우 많은 좌표로 구성될 수 있습니다. 이에 대해 필요에 맞게 간략화가 필요한데, 간략화 알고리즘은 Douglas-Peucker Algorithm을 사용합니다. 아래의 예제는 어떤 등치선에 대해 자신의 가장자리 길이의 10% 길이값을 기준으로 간략화가 적용해 새로운 등치선을 계산합니다.
epsilon = 0.1*cv2.arcLength(cnt,True)
approx = cv2.approxPolyDP(cnt,epsilon,True)
아래 그림을 보면..
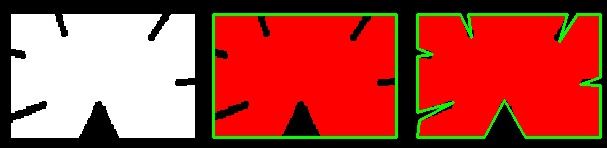
첫번째 이미지가 입력된 등치선이고.. 두번째가 가장자리 거리의 10% 길이를 기준으로 간략화된 등치선, 세번째가 1% 길이를 기준으로 간략화된 등치선을 초록색 선으로 표기하고 있습니다.
지금까지의 내용을 되짚어 보면, 등치선은 하나의 2차원 도형으로 생각할 수 있습니다. 도형에 대한 연산 중 볼록껍대기(Convex Hull) 도형을 추출하는 함수는 다음과 같습니다.
hull = cv2.convexHull(cnt)
주어진 등치선이 볼록 도형인지의 여부는 다음 함수를 통해 식별할 수 있습니다.
k = cv2.isContourConvex(cnt)
등치선으로 구성된 도형에 대해.. 이 도형을 감싸는 다양한 또 다른 도형을 생각해 볼 수 있는데, 가장 쉽게는 사각영역을 생각해 볼 수 있습니다. 아래 코드가 바로 도형을 감싸는 사각형 영역을 추출하는 예제입니다.
import numpy as np
import cv2

img = cv2.imread('./data/thunder.png')
imgray = cv2.cvtColor(img,cv2.COLOR_BGR2GRAY)
ret,thresh = cv2.threshold(imgray,127,255,0)
image, contours, hierarchy = cv2.findContours(thresh,cv2.RETR_TREE,cv2.CHAIN_APPROX_SIMPLE)

cnt = contours[0]

x,y,w,h = cv2.boundingRect(cnt)
img = cv2.rectangle(img,(x,y),(x+w,y+h),(0,0,255),2)

cv2.imshow('img', img)
cv2.waitKey()
cv2.destroyAllWindows()
결과는 다음과 같습니다.

단순한 사각형이 아닌 최소 넓이를 갖는 회전된 사각영역도 얻을 수 있는데, 코드는 다음과 같습니다.
import numpy as np
import cv2

img = cv2.imread('./data/thunder.png')
imgray = cv2.cvtColor(img,cv2.COLOR_BGR2GRAY)
ret,thresh = cv2.threshold(imgray,127,255,0)
image, contours, hierarchy = cv2.findContours(thresh,cv2.RETR_TREE,cv2.CHAIN_APPROX_SIMPLE)

cnt = contours[0]

rect = cv2.minAreaRect(cnt)
box = cv2.boxPoints(rect)
box = np.int0(box)
img = cv2.drawContours(img,[box],0,(0,0,255),2)

cv2.imshow('img', img)
cv2.waitKey()
cv2.destroyAllWindows()
결과는 다음과 같습니다.

도형을 감싸는 정방원에 대한 예제 코드는 아래와 같습니다.
import numpy as np
import cv2

img = cv2.imread('./data/thunder.png')
imgray = cv2.cvtColor(img,cv2.COLOR_BGR2GRAY)
ret,thresh = cv2.threshold(imgray,127,255,0)
image, contours, hierarchy = cv2.findContours(thresh,cv2.RETR_TREE,cv2.CHAIN_APPROX_SIMPLE)

cnt = contours[0]

(x,y),radius = cv2.minEnclosingCircle(cnt)
center = (int(x),int(y))
radius = int(radius)
img = cv2.circle(img,center,radius,(0,0,255),2)

cv2.imshow('img', img)
cv2.waitKey()
cv2.destroyAllWindows()
결과는 다음과 같습니다.

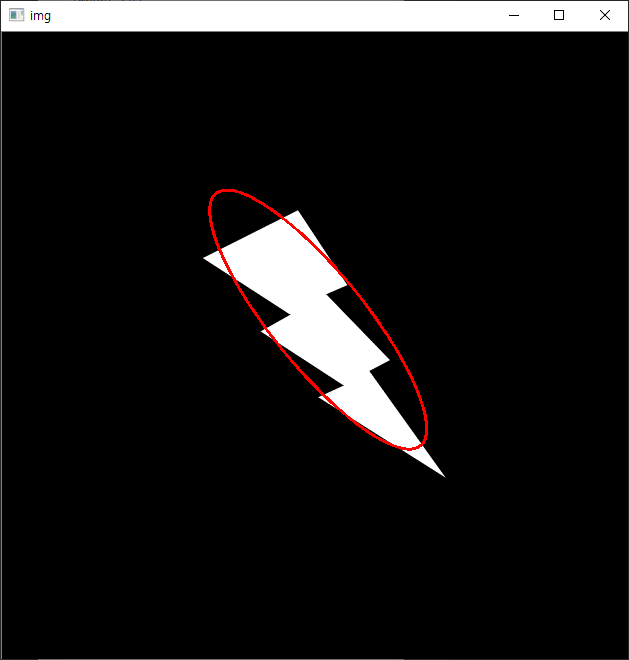
감싸는 최소 넓이의 타원은 다음과 같습니다.
import numpy as np
import cv2

img = cv2.imread('./data/thunder.png')
imgray = cv2.cvtColor(img,cv2.COLOR_BGR2GRAY)
ret,thresh = cv2.threshold(imgray,127,255,0)
image, contours, hierarchy = cv2.findContours(thresh,cv2.RETR_TREE,cv2.CHAIN_APPROX_SIMPLE)

cnt = contours[0]

ellipse = cv2.fitEllipse(cnt)
img = cv2.ellipse(img,ellipse,(0,0,255),2)

cv2.imshow('img', img)
cv2.waitKey()
cv2.destroyAllWindows()
결과는 다음과 같습니다. (결과가 좀 이상한데…)
끝으로 등치선으로 구성된 도형의 주축에 대한 선을 얻는 예제는 다음과 같습니다.
import numpy as np
import cv2

img = cv2.imread('./data/thunder.png')
imgray = cv2.cvtColor(img,cv2.COLOR_BGR2GRAY)
ret,thresh = cv2.threshold(imgray,127,255,0)
image, contours, hierarchy = cv2.findContours(thresh,cv2.RETR_TREE,cv2.CHAIN_APPROX_SIMPLE)

cnt = contours[0]

rows,cols = img.shape[:2]
[vx,vy,x,y] = cv2.fitLine(cnt, cv2.DIST_L2,0,0.01,0.01)
lefty = int((-x*vy/vx) + y)
righty = int(((cols-x)*vy/vx)+y)
img = cv2.line(img,(cols-1,righty),(0,lefty),(0,0,255),2)

cv2.imshow('img', img)
cv2.waitKey()
cv2.destroyAllWindows()
결과는 다음과 같습니다.
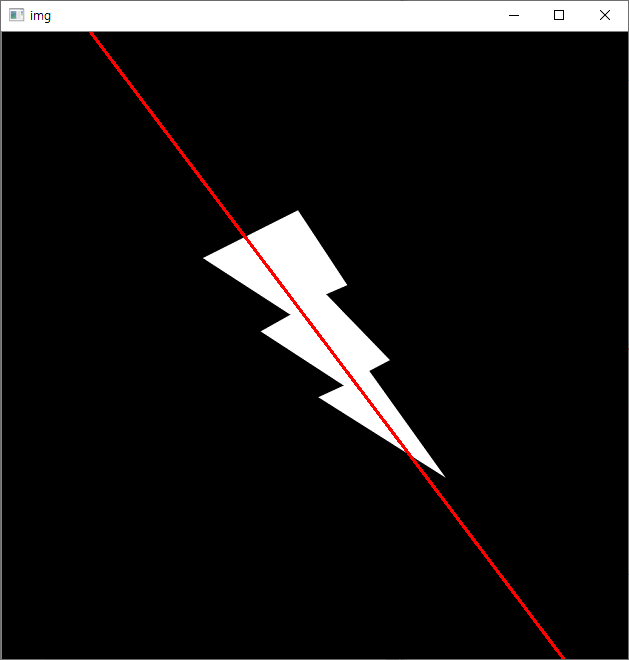
cv2.fitline에서 lefty와 righty는 무엇을 의미하는지 알 수 있을까요?
주축에 대한 선의 구성 좌표입니다.
제가 답변이 매우 느린점 죄송합니다.
답변 정말 감사합니다!