
패턴명칭
Prototype
필요한 상황
어떤 객체가 생성되고, 그 객체의 상태값이 변경된 후 그 객체와 동일한 상태의 또 다른 복사본을 생성하고자 할때 사용할 수 있는 패턴이다. 복사본의 상태의 변경으로인해 원본의 상태는 변경되지 않는다.
예제 코드
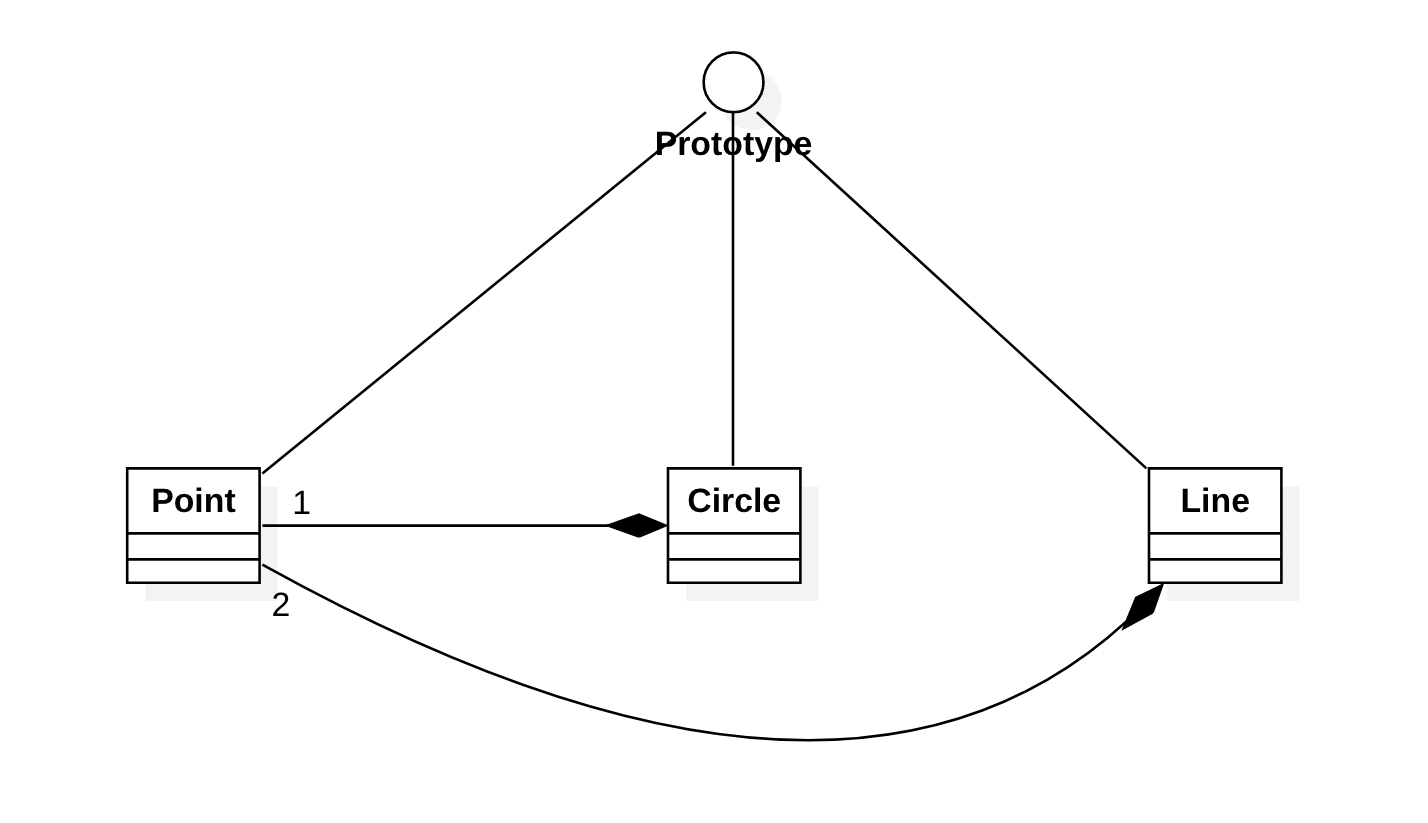
Point와 Circle 그리고 Line은 Prototype 인터페이스를 구현하는 클래스이다. Prototype을 구현한 클래스는 자신의 상태값을 완전하게 복사할 책임을 갖는다. Prototype의 코드는 다음과 같다.
package tstThread;

public interface Prototype {
	Prototype clone();
}
Point 클래스는 다음과 같다.
package tstThread;

public class Point implements Prototype {
	private int x;
	private int y;

	public Point setX(int x) {
		this.x = x;
		return this;
	}

	public Point setY(int y) {
		this.y = y;
		return this;
	}

	public int getX() {
		return x;
	}

	public int getY() {
		return y;
	}

	@Override
	public Prototype clone() {
		Point newPoint = new Point();
		newPoint.x = this.x;
		newPoint.y = this.y;

		return newPoint;
	}

	@Override
	public String toString() {
		return "POINT(" + x + " " + y + ")";
	}
}
Circle 클래스는 다음과 같다.
package tstThread;

public class Circle implements Prototype {
	private Point center;
	private int radius;

	public Circle setCenter(Point center) {
		this.center = (Point)center.clone();
		return this;
	}

	public Circle setRadius(int radius) {
		this.radius = radius;
		return this;
	}

	public Point getCenter() {
		return (Point)center.clone();
	}

	public int getRadius() {
		return radius;
	}

	@Override
	public Prototype clone() {
		Circle newCircle = new Circle();

		newCircle.center = (Point)center.clone();
		newCircle.radius = this.radius;

		return newCircle;
	}

	@Override
	public String toString() {
		return "CIRCLE(center: " + center + ", radius: " + radius + ")";
	}
}
Line 클래스는 다음과 같다.
package tstThread;

public class Line implements Prototype {
	private Point startPt;
	private Point endPt;

	public Line setStartPoint(Point pt) {
		this.startPt = (Point)pt.clone();
		return this;
	}

	public Point getStartPoint() {
		return (Point)startPt.clone();
	}

	public Line setEndPoint(Point pt) {
		this.endPt = (Point)pt.clone();
		return this;
	}

	public Point getEndPoint() {
		return (Point)endPt.clone();
	}

	@Override
	public Prototype clone() {
		Line newLine = new Line();

		newLine.startPt = (Point)startPt.clone();
		newLine.endPt = (Point)endPt.clone();

		return newLine;
	}

	@Override
	public String toString() {
		return "LINE(" + startPt + ", " + endPt + ")";
	}
}
지금까지의 클래스를 사용하는 예제는 다음과 같다.
package tstThread;

import java.io.UnsupportedEncodingException;

public class Main {
	public static void main(String[] args) throws UnsupportedEncodingException {
		Point center = new Point();
		center.setX(100);
		center.setY(200);

		Circle circle = new Circle();
		circle.setCenter(center);
		circle.setRadius(50);

		Point startPt = new Point();
		startPt.setX(10);
		startPt.setY(20);

		Point endPt = new Point();
		endPt.setX(40);
		endPt.setY(60);

		Line line = new Line();
		line.setStartPoint(startPt);
		line.setEndPoint(endPt);

		System.out.println(circle);
		System.out.println(line);

		Circle otherCircle = (Circle)circle.clone();
		Line otherLine = (Line)line.clone();

		System.out.println(otherCircle);
		System.out.println(otherLine);
	}
}
실행 결과는 다음과 같다.
CIRCLE(center: POINT(100 200), radius: 50)
LINE(POINT(10 20), POINT(40 60))
CIRCLE(center: POINT(100 200), radius: 50)
LINE(POINT(10 20), POINT(40 60))
이 글은 소프트웨어 설계의 기반이 되는 GoF의 디자인패턴에 대한 강의자료입니다. 완전한 실습을 위해 이 글에서 소개하는 클래스 다이어그램과 예제 코드는 완전하게 실행되도록 제공되지만, 상대적으로 예제 코드와 관련된 설명이 함축적으로 제공되고 있습니다. 이 글에 대해 궁금한 점이 있으면 댓글을 통해 남겨주시기 바랍니다.