
패턴명칭
Flyweight
필요한 상황
동일한 객체를 자주 생성해서 사용할때, 매번 다시 생성하지 않고 객체풀(Object Pool)에 저장해 놓고 재활용하는 패턴이다. 메모리 절약과 객체 생성시 소요되는 시간을 줄여 퍼포먼스를 향상시킬 수 있다.
예제 코드

Digit는 0부터 9까지의 숫자를 8×8 도트문자로 화면에 표시하기 위해 아래와 같은 파일(digits.txt)로부터 데이터를 읽어들인다.
0
  ###
 #   #
 #   #
 #   #
 #   #
 #   #
 #   #
  ###
1
   #
  ##
   #
   #
   #
   #
   #
  ###
2
  ###
 #   #
     #
     #
    #
   #
  #
 #####
3
  ###
 #   #
     #
   ##
     #
     #
 #   #
  ###
4
     #
    ##
   # #
  #  #
 #   #
 #####
     #
     #
5
 #####
 #
 #
 ####
     #
     #
 #   #
  ###
6
  ###
 #   #
 #
 ####
 #   #
 #   #
 #   #
  ###
7
 #####
     #
     #
    #
   #
  #
  #
  #
8
  ###
 #   #
 #   #
  ###
 #   #
 #   #
 #   #
  ###
9
  ###
 #   #
 #   #
 #   #
  ####
     #
 #   #
  ###
Digit 클래스는 다음과 같다.
package tstThread;

import java.io.BufferedReader;
import java.io.FileReader;
import java.io.IOException;
import java.util.ArrayList;

public class Digit {
	private ArrayList<String> data = new ArrayList<String>();

	public Digit(int n) {
		FileReader fr = null;
		BufferedReader br = null;
		try {
			fr = new FileReader("./digits.txt");
			br = new BufferedReader(fr);

			int nLine = 0;
			while((br.readLine()) != null) {
				if(n*9 == nLine) {
					for(int i=0; i<8; i++) {
						data.add(br.readLine());
					}
					break;
				}

				nLine++;
			}
		} catch(IOException e) {
			e.printStackTrace();
		} finally {
			try {
				if(fr != null) fr.close();
				if(br != null) br.close();
			} catch (IOException e) {
				e.printStackTrace();
			}
		}
	}

	public void print(int x, int y) {
		for(int i=0; i<8; i++) {
			String line = data.get(i);
			System.out.print(String.format("%c[%d;%df",0x1B,y+i,x));
			System.out.print(line);
		}

	}
}
DigitFactory 클래스는 Digit 객체를 생성하며, 한번 생성된 번호의 Digit 객체는 메모리 풀에 저장해두고 재활용한다. 메모리 풀은 HashMap을 사용했다. 코드는 아래와 같다.
package tstThread;

import java.util.HashMap;

public class DigitFactory {
	private HashMap<Integer, Digit> pool = new HashMap<Integer, Digit>();

	public Digit getDigit(int n) {
		if(pool.containsKey(n)) {
			return pool.get(n);
		} else {
			Digit digit = new Digit(n);
			pool.put(n, digit);
			return digit;
		}
	}
}
Number는 여러 개의 Digit로 구성된 정수값이, Number를 구성하는 Digit 객체는 Number의 생성자에서 DigitFactory 클래스를 이용해 생성한다.
package tstThread;

import java.util.ArrayList;

public class Number {
	private ArrayList<Digit> digits = new ArrayList<Digit>();

	public Number(int number) {
		DigitFactory digitFactory = new DigitFactory();

		String strNum = Integer.toString(number);
		int len = strNum.length();

		for(int i=0; i<len; i++) {
			int n = Character.getNumericValue(strNum.charAt(i));
			Digit digit = digitFactory.getDigit(n);
			digits.add(digit);
		}
	}

	public void print(int x, int y) {
		int cntDigits = digits.size();
		for(int i=0; i<cntDigits; i++) {
			Digit digit = digits.get(i);
			digit.print(x+(i*8), y);
		}
	}
}
이 클래스들의 사용은 다음과 같다.
package tstThread;
public class Main {
public static void main(String[] args) {
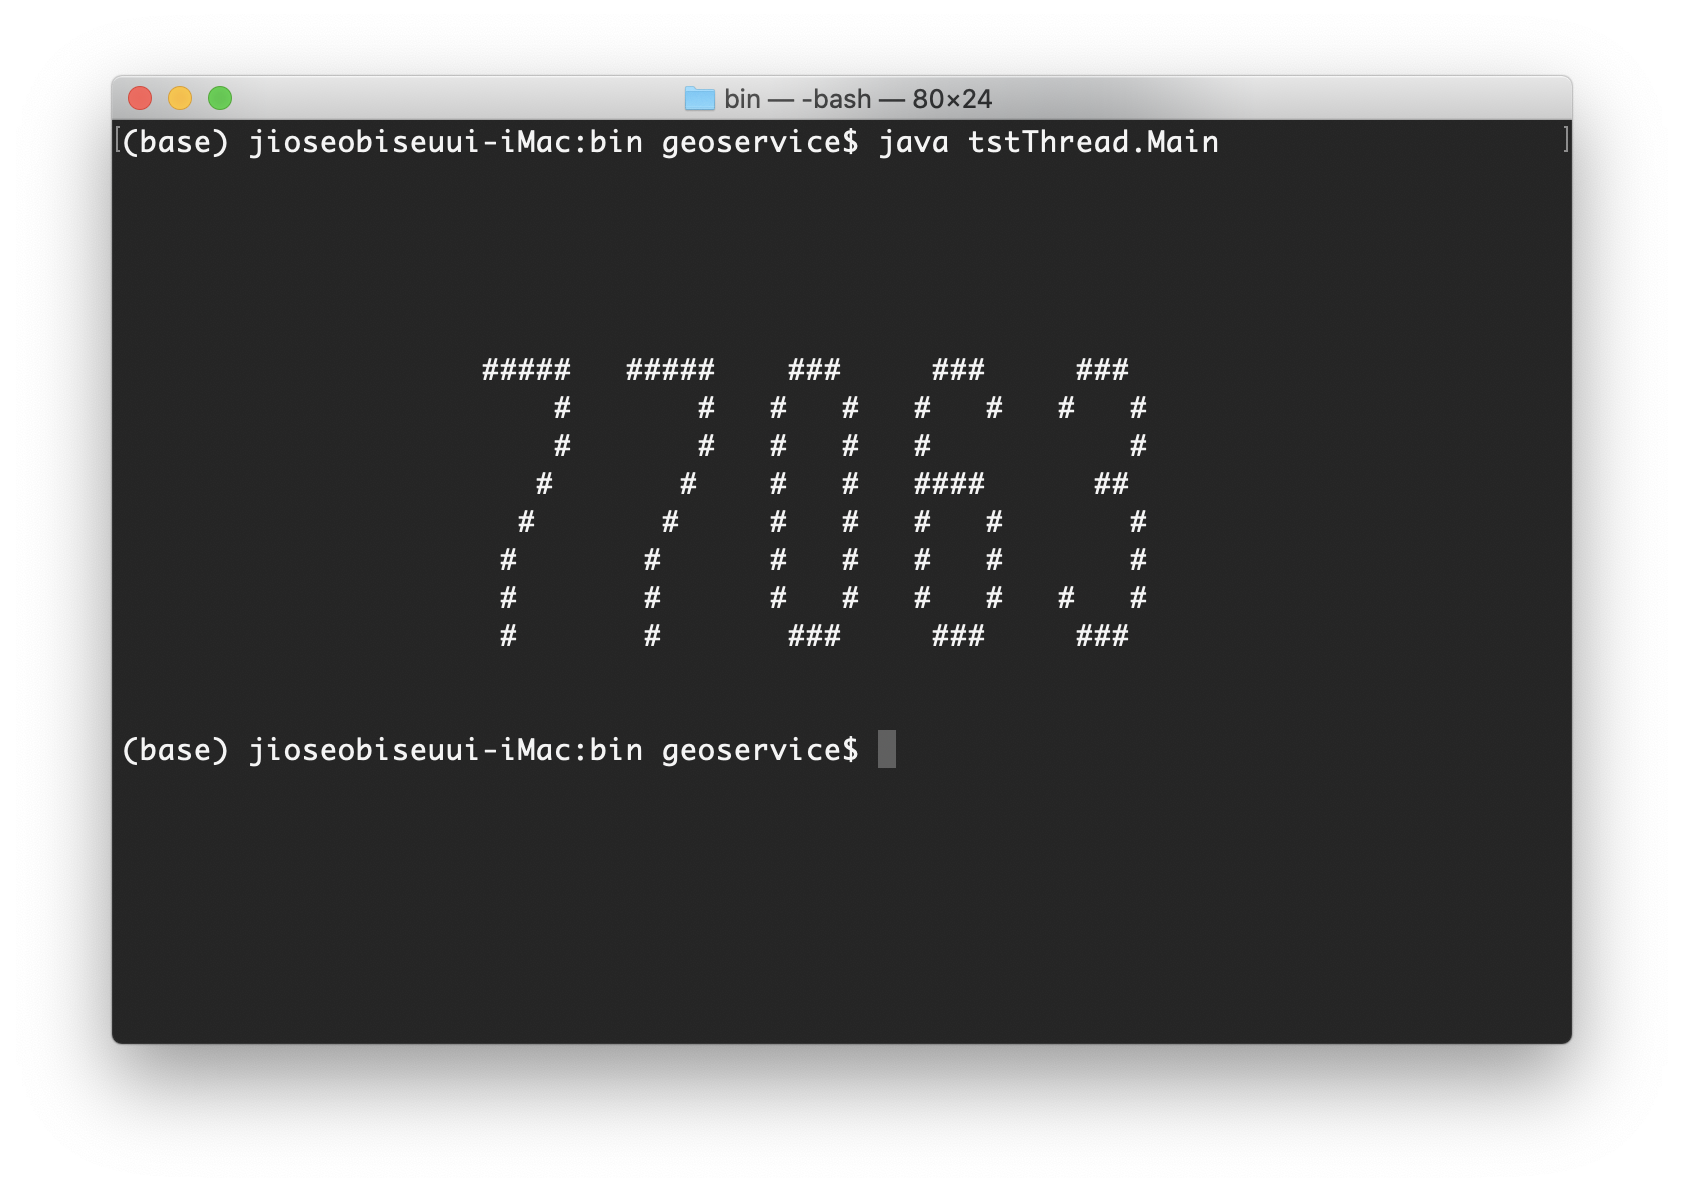
Number number = new Number(77063);
number.print(20, 7);
System.out.println();
System.out.println();
System.out.println();
}
}
실행결과는 다음과 같다.
이 글은 소프트웨어 설계의 기반이 되는 GoF의 디자인패턴에 대한 강의자료입니다. 완전한 실습을 위해 이 글에서 소개하는 클래스 다이어그램과 예제 코드는 완전하게 실행되도록 제공되지만, 상대적으로 예제 코드와 관련된 설명이 함축적으로 제공되고 있습니다. 이 글에 대해 궁금한 점이 있으면 댓글을 통해 남겨주시기 바랍니다.