패턴명칭
Decorator
필요한 상황
어떤 기능을 기준으로 다른 여러가지 종속적인 기능들을 효과적으로 추가할 수 있는 패턴이다.
예제 코드
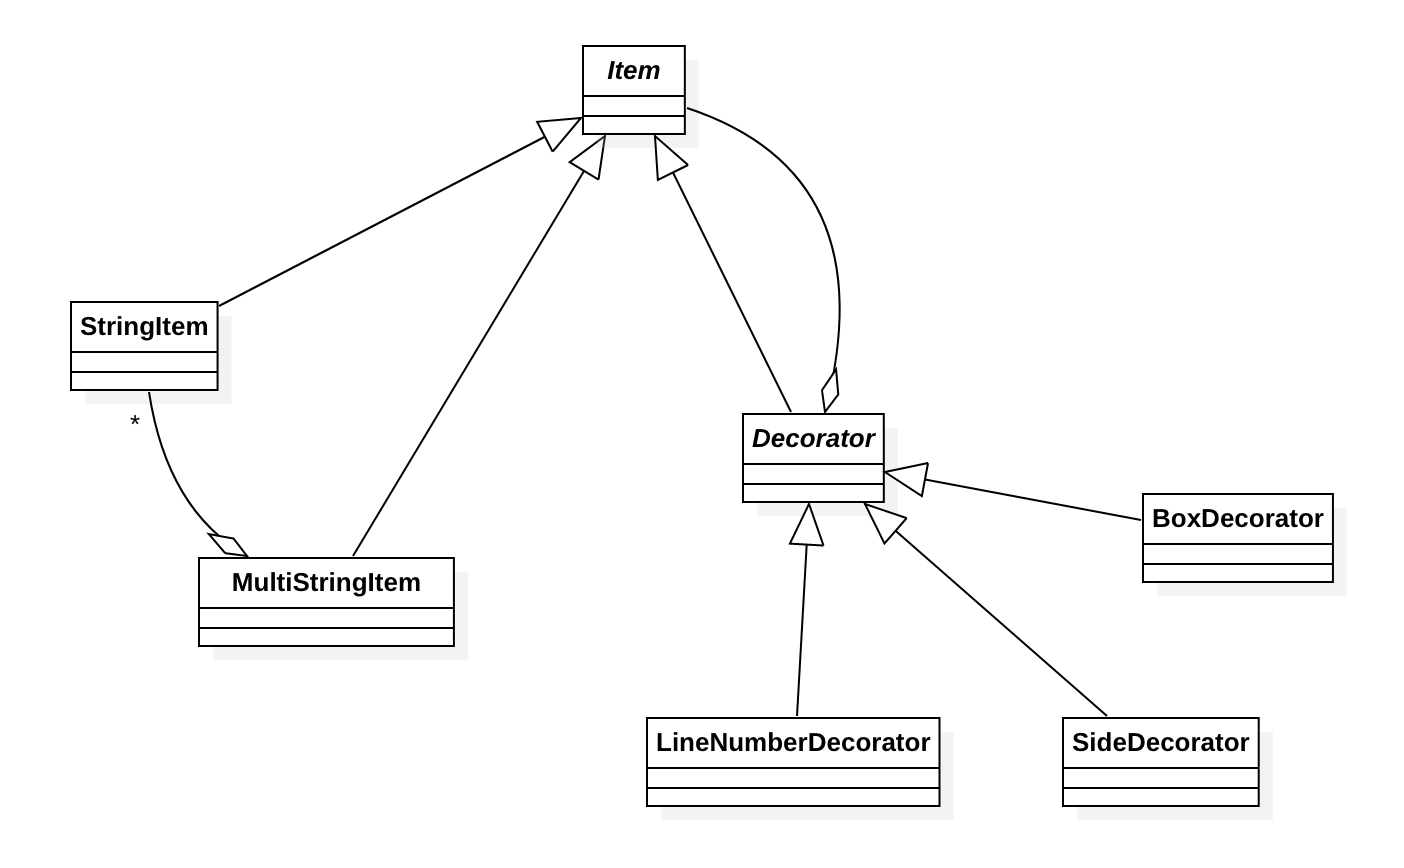
Item은 기준이 되는 기능과 장식처럼 추가할 수 있는 종속적인 기능을 동일한 개념으로 간주하기 위한 클래스이다. StringItem과 MultiStringItem이 기준이 되는 기능이고, Decorator가 종속적인 기능이다. 종속적인 기능은 이 Decorator를 상속받아 효율적으로 추가할 수 있다. 먼저 Item 클래스는 다음과 같다.
package tstThread;

import java.io.UnsupportedEncodingException;

public abstract class Item {
	public abstract int getHeight();
	public abstract int getMaxWidth() throws UnsupportedEncodingException;
	public abstract int getWidth(int index) throws UnsupportedEncodingException;
	public abstract String getContent(int index) throws UnsupportedEncodingException;

	public void print() throws UnsupportedEncodingException {
		int height = getHeight();
		for(int i=0; i<height; i++) {
			String content = getContent(i);
			System.out.println(content);
		}
	}
}
기준이 되는 기본 기능인 StringItem은 하나의 문자열을 처리하며 다음과 같다.
package tstThread;

import java.io.UnsupportedEncodingException;

public class StringItem extends Item {
	private String content;

	public StringItem(String content) {
		this.content = content;
	}

	@Override
	public int getHeight() {
		return 1;
	}

	@Override
	public int getMaxWidth() throws UnsupportedEncodingException {
		return content.getBytes("euc-kr").length;
	}

	@Override
	public String getContent(int index) {
		return content;
	}

	@Override
	public int getWidth(int index) throws UnsupportedEncodingException {
		return getMaxWidth();
	}
}
마찬가지로 기본이 되는 기능인 MultiStringItem은 StringItem을 여러개 가질 수 있어서 여러개의 문자열을 처리할 수 있으며 코드는 다음과 같다.
package tstThread;

import java.io.UnsupportedEncodingException;
import java.util.ArrayList;
import java.util.Iterator;

public class MultiStringItem extends Item {
	private ArrayList<StringItem> strings = new ArrayList<StringItem>();

	public MultiStringItem() {}

	@Override
	public int getHeight() {
		return strings.size();
	}

	@Override
	public int getMaxWidth() throws UnsupportedEncodingException {
		Iterator<StringItem> iter = strings.iterator();
		int maxWidth = 0;

		while(iter.hasNext()) {
			Item stringItem = iter.next();
			int width = stringItem.getMaxWidth();

			if(width > maxWidth) maxWidth = width;
		}

		return maxWidth;
	}

	@Override
	public String getContent(int index) throws UnsupportedEncodingException {
		StringItem item = strings.get(index);
		return item.getContent(index);
	}

	public void addItem(StringItem item) {
		strings.add(item);
	}

	@Override
	public int getWidth(int index) throws UnsupportedEncodingException {
		return strings.get(index).getMaxWidth();
	}
}
기본 기능에 장식처럼 또 다른 기능을 위한 Decorator 클래스는 다음과 같다.
package tstThread;

public abstract class Decorator extends Item {
	protected Item item;
	public Decorator(Item item) {
		this.item = item;
	}
}
Decorator의 item 필드가 장식할 대상이 되는 객체이다. 즉 Decorator는 기본 기능 뿐만 아니라 Decorator에 대한 보조 기능도 장식할 수 있다. 이제 이 Decorator에 대한 구체적인 파생 클래스들을 보자. 먼저 SideDecorator이다.
package tstThread;

import java.io.UnsupportedEncodingException;

public class SideDecorator extends Decorator {
	private Character ch;

	public SideDecorator(Item item, Character ch) {
		super(item);
		this.ch = ch;
	}

	@Override
	public int getMaxWidth() throws UnsupportedEncodingException {
		return item.getMaxWidth() + 2;
	}

	@Override
	public String getContent(int index) throws UnsupportedEncodingException {
		return ch + item.getContent(index) + ch;
	}

	@Override
	public int getHeight() {
		return item.getHeight();
	}

	@Override
	public int getWidth(int index) throws UnsupportedEncodingException {
		return item.getWidth(index) + 2;
	}
}
다음은 LineNumberDecorator이다.
package tstThread;

import java.io.UnsupportedEncodingException;

public class LineNumberDecorator extends Decorator {

	public LineNumberDecorator(Item item) {
		super(item);
	}

	@Override
	public int getHeight() {
		return item.getHeight();
	}

	@Override
	public int getMaxWidth() throws UnsupportedEncodingException {
		return item.getMaxWidth() + 4;
	}

	@Override
	public int getWidth(int index) throws UnsupportedEncodingException {
		return item.getWidth(index) + 4;
	}

	@Override
	public String getContent(int index) throws UnsupportedEncodingException {
		return String.format("%02d", index) + ": " + item.getContent(index);
	}
}
BoxDecorator는 다음과 같다.
package tstThread;

import java.io.UnsupportedEncodingException;

public class BoxDecorator extends Decorator {
	public BoxDecorator(Item item) {
		super(item);
	}

	@Override
	public int getHeight() {
		return item.getHeight()+2;
	}

	@Override
	public int getMaxWidth() throws UnsupportedEncodingException {
		return item.getMaxWidth() + 2;
	}

	@Override
	public int getWidth(int index) throws UnsupportedEncodingException {
		return item.getWidth(index) + 2;
	}

	@Override
	public String getContent(int index) throws UnsupportedEncodingException {
		int maxWidth = this.getMaxWidth();
		if(index == 0 || index == getHeight()-1) {
			StringBuilder sb = new StringBuilder();
			sb.append('+');
			for(int i=0; i<maxWidth-2; i++) {
				sb.append('-');
			}
			sb.append('+');
			return sb.toString();
		} else {
			return '|' + item.getContent(index-1) + makeTailString(maxWidth - getWidth(index-1));
		}
	}

	private String makeTailString(int count) {
		StringBuilder sb = new StringBuilder();
		for(int i=0; i<count; i++) {
			sb.append(' ');
		}
		sb.append('|');

		return sb.toString();
	}
}
지금까지의 클래스를 사용하는 코드는 다음과 같다.
package tstThread;

import java.io.UnsupportedEncodingException;

public class Main {
	public static void main(String[] args) throws UnsupportedEncodingException {
		StringItem item1 = new StringItem("안녕하십니까?");
		StringItem item2 = new StringItem("제 이름은 김형준입니다.");
		StringItem item3 = new StringItem("반갑습니다.");
		StringItem item4 = new StringItem("디자인패턴의 세계에 푹 빠져보시죠.");

		MultiStringItem multiStringItem = new MultiStringItem();
		multiStringItem.addItem(item1);
		multiStringItem.addItem(item2);
		multiStringItem.addItem(item3);
		multiStringItem.addItem(item4);

		Decorator sideDecorator = new SideDecorator(multiStringItem, '\"');
		Decorator lineNumberDecorator = new LineNumberDecorator(sideDecorator);
		Decorator boxDecorator = new BoxDecorator(lineNumberDecorator);

		boxDecorator.print();
	}
}
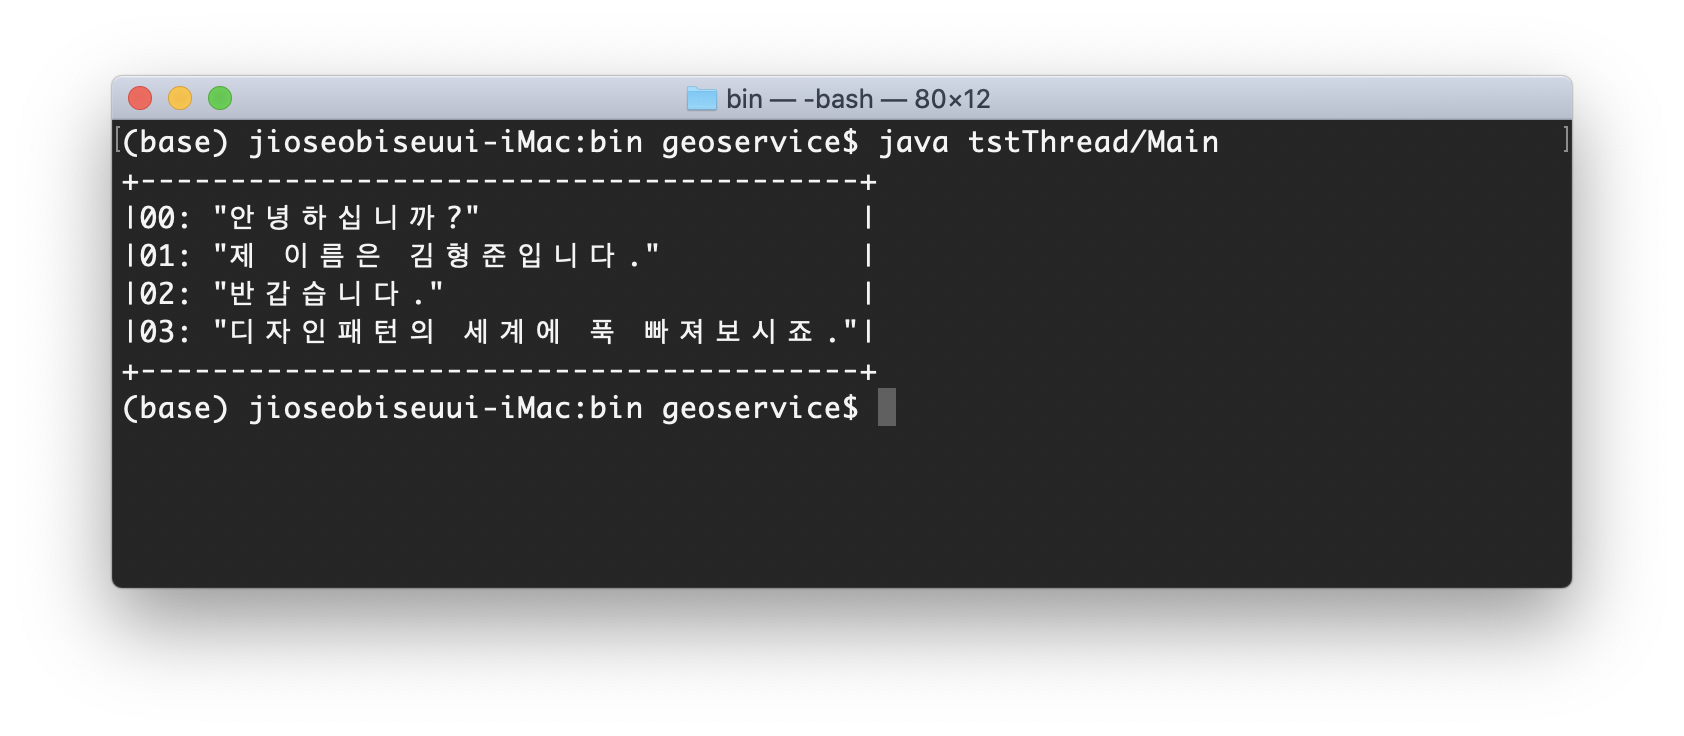
기본 기능인 multiStringItem에 3개의 장식인 sideDecorator, lineNumberDecorator, boxDecorator을 적용한 예로 실행 결과는 다음과 같다.
다음은 기본 기능인 multiStringItem은 그대로 사용하고 3개의 장식의 순서를 달리한 예이다.
package tstThread;

import java.io.UnsupportedEncodingException;

public class Main {
	public static void main(String[] args) throws UnsupportedEncodingException {
		StringItem item1 = new StringItem("안녕하십니까?");
		StringItem item2 = new StringItem("제 이름은 김형준입니다.");
		StringItem item3 = new StringItem("반갑습니다.");
		StringItem item4 = new StringItem("디자인패턴의 세계에 푹 빠져보시죠.");

		MultiStringItem multiStringItem = new MultiStringItem();
		multiStringItem.addItem(item1);
		multiStringItem.addItem(item2);
		multiStringItem.addItem(item3);
		multiStringItem.addItem(item4);

		Decorator boxDecorator = new BoxDecorator(multiStringItem);
		Decorator lineNumberDecorator = new LineNumberDecorator(boxDecorator);
		Decorator sideDecorator = new SideDecorator(lineNumberDecorator, '\"');

		sideDecorator.print();
	}
}
실행 결과는 다음과 같다.

이 글은 소프트웨어 설계의 기반이 되는 GoF의 디자인패턴에 대한 강의자료입니다. 완전한 실습을 위해 이 글에서 소개하는 클래스 다이어그램과 예제 코드는 완전하게 실행되도록 제공되지만, 상대적으로 예제 코드와 관련된 설명이 함축적으로 제공되고 있습니다. 이 글에 대해 궁금한 점이 있으면 댓글을 통해 남겨주시기 바랍니다.