[GoF] Memento 패턴

패턴명칭

Memento

필요한 상황

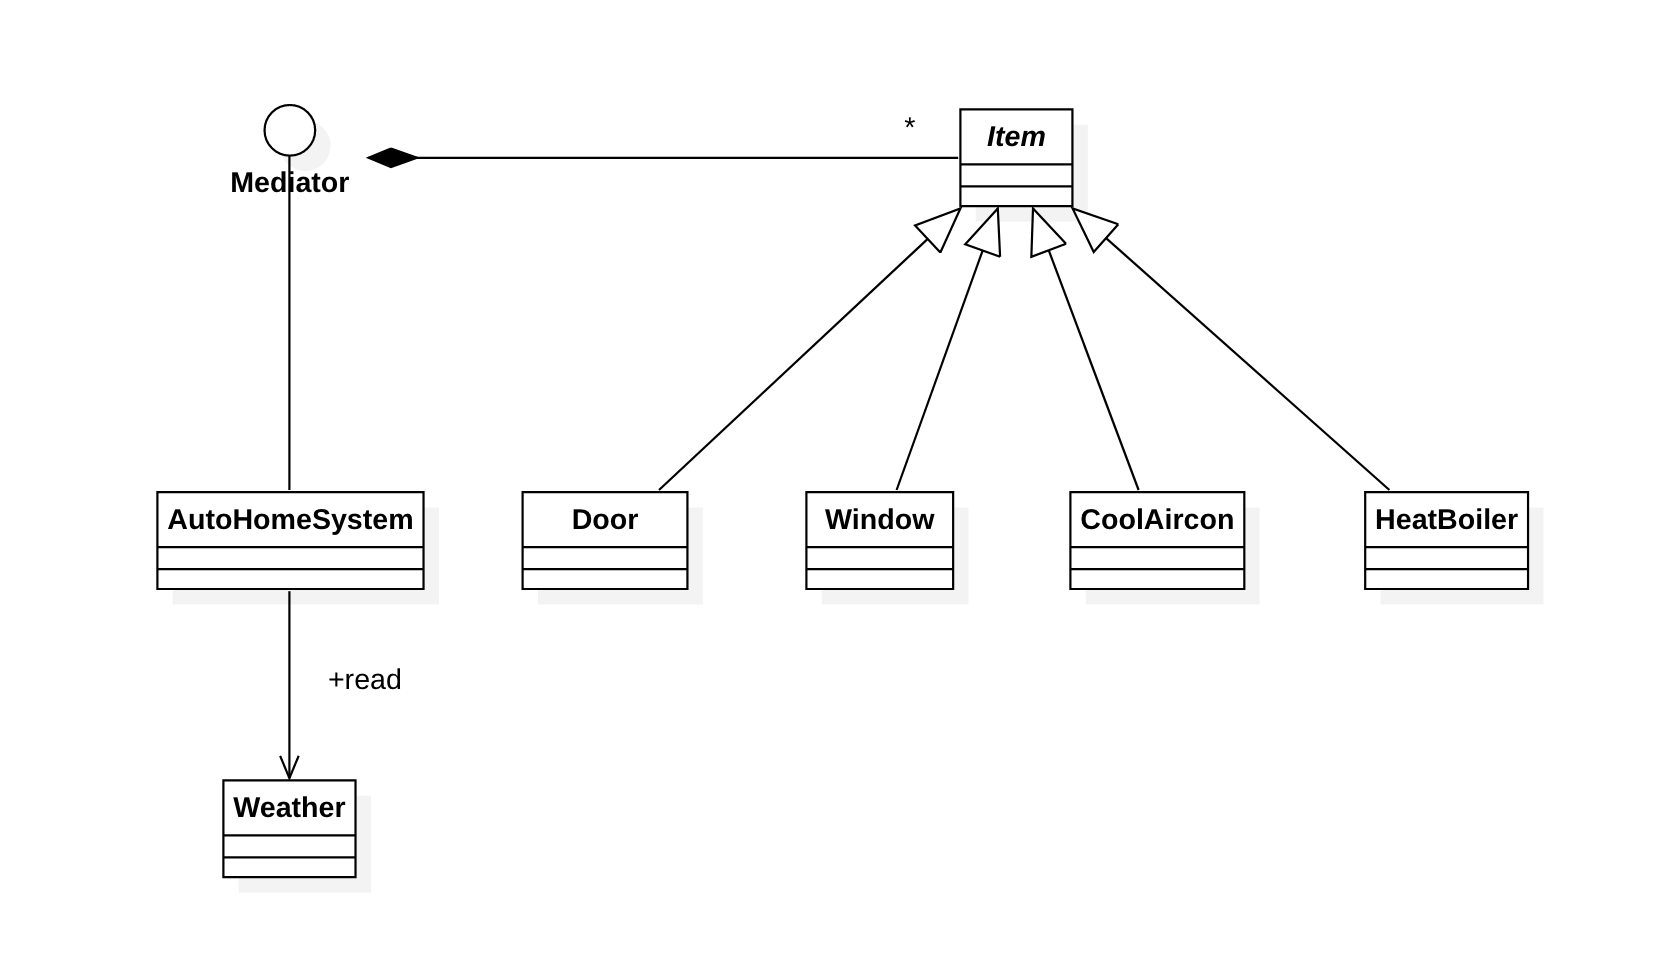
시간에 따른 순차적인 연산을 수행하면서, 원하는 시점의 상태로 되돌아갈 필요가 있을때 사용하는 패턴이다.

예제 코드

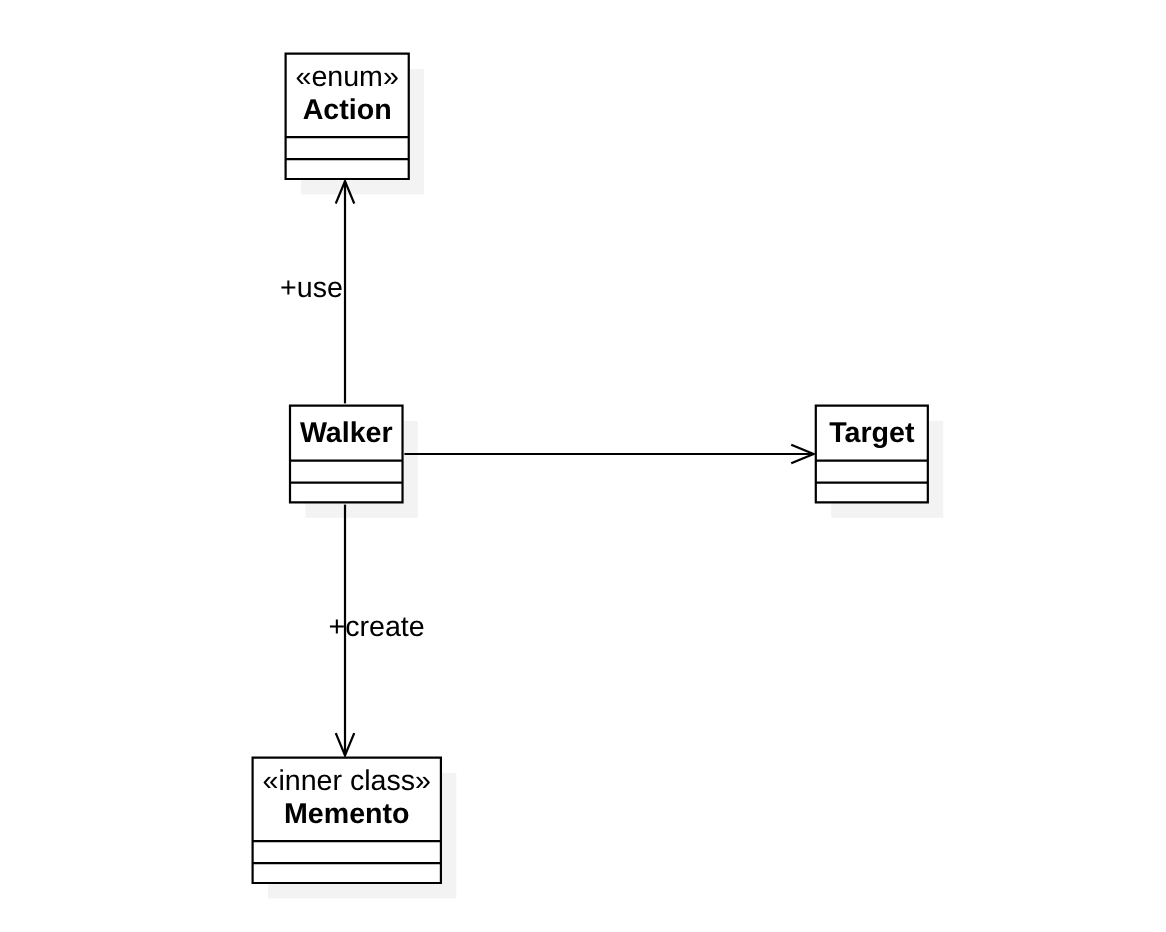
Walker 클래스의 객체는 위, 오른쪽, 아래, 왼쪽으로 1 단위씩 이동하여 점점 Target 클래스의 객체에 저장된 x, y 좌표로 가도록 가장 최적의 Walker 객체의 상태를 Memento 클래스를 이용해 저장하고 다시 복원한다. Memento 클래스는 Walker의 inner class인데, 이유는 오직 Walker에만 정보를 전달하기 위함이다. 동시에 Memento의 생성자는 private인데 이는 오직 Walker만이 Memento 객체를 생성할 수 있도록 하기 위함이다. 먼저 Target 클래스이다.

package tstThread;

public class Target {
	private int x;
	private int y;
	
	public Target(int x, int y) {
		this.x = x;
		this.y = y;
	}
	
	public double getDictance(int x0, int y0) {
		return Math.sqrt((x-x0)*(x-x0)+(y-y0)*(y-y0));
	}
}

다음은 Action 열거자이다.

package tstThread;

public enum Action {
	UP, RIGHT, DOWN, LEFT;
	
	public static Action fromIndex(int i) {
		if(i == 0) return UP;
		else if(i == 1) return RIGHT;
		else if(i == 2) return DOWN;
		else return LEFT;	
	}
}

다음은 Walker 클래스와 그 내부 클래스인 Memento 클래스이다.

package tstThread;

import java.util.ArrayList;

public class Walker {
	private int x;
	private int y;
	private ArrayList<Action> actions = new ArrayList<Action>();
		
	public Walker(int x, int y) {
		this.x = x;
		this.y = y;
	}
	
	public double walk(Action action, Target target) {
		actions.add(action);
		
		if(action == Action.UP) {
			y += 1;
		} else if(action == Action.RIGHT) {
			x += 1;
		} else if(action == Action.DOWN) {
			y -= 1;
		} else if(action == Action.LEFT) {
			x -= 1;
		}
		
		return target.getDictance(x, y);
	}
	
	public class Memento {
		private int x;
		private int y;
		private ArrayList<Action< actions;
		
		private Memento() {}
	}
	
	public Memento createMemento() {
		Memento memento = new Memento();
		
		memento.x = this.x;
		memento.y = this.y;
		memento.actions = (ArrayList<Action>)this.actions.clone();
		
		return memento;
	}
	
	public void restoreMemento(Memento memento) {
		this.x = memento.x;
		this.y = memento.y;
		this.actions = (ArrayList<Action>)memento.actions.clone();
	}
	
	public String toString() {
		return actions.toString();
	}
}

끝으로 지금까지의 클래스들을 사용하는 코드이다.

package tstThread;

import java.util.Random;

import tstThread.Walker.Memento;

public class Main {
	public static void main(String[] args) {
		Target target = new Target(10, 10);
		Walker walker = new Walker(0, 0);
		
		Random random = new Random();
		
		double minDistance = Double.MAX_VALUE;
		Memento memento = null;
		while(true) {
			Action nextAction = Action.fromIndex(random.nextInt(4));
			double distance = walker.walk(nextAction, target);
			
			
			System.out.println(nextAction + " " + distance);
			
			if(distance == 0.0) {
				break;
			}
			
			if(minDistance > distance) {
				minDistance = distance;
				memento = walker.createMemento();
			} else {
				if(memento != null) {
					walker.restoreMemento(memento);
				}
			}
		}
		
		System.out.println("Walker's path: " + walker);
	}
}

실행 결과는 다음과 같다.

RIGHT 13.45362404707371
LEFT 14.142135623730951
RIGHT 12.806248474865697
DOWN 13.601470508735444
UP 12.041594578792296
UP 11.313708498984761
DOWN 12.041594578792296
RIGHT 10.63014581273465
RIGHT 10.0
UP 9.219544457292887
LEFT 9.899494936611665
RIGHT 8.602325267042627
LEFT 9.219544457292887
UP 7.810249675906654
LEFT 8.48528137423857
RIGHT 7.211102550927978
DOWN 8.06225774829855
UP 6.4031242374328485
DOWN 7.211102550927978
RIGHT 5.830951894845301
DOWN 6.708203932499369
UP 5.0
DOWN 5.830951894845301
RIGHT 4.47213595499958
DOWN 5.385164807134504
RIGHT 4.123105625617661
DOWN 5.0990195135927845
RIGHT 4.0
LEFT 4.123105625617661
DOWN 5.0
DOWN 5.0
RIGHT 4.123105625617661
UP 3.0
UP 2.0
LEFT 2.23606797749979
UP 1.0
LEFT 1.4142135623730951
DOWN 2.0
UP 0.0
Walker's path: [RIGHT, RIGHT, UP, UP, RIGHT, RIGHT, UP, RIGHT, UP, RIGHT, UP, RIGHT, UP, RIGHT, RIGHT, RIGHT, UP, UP, UP, UP]

Walker 객체가 어떤 행위를 취했을때 이전의 행위에 대한 목적지까지의 거리보다 더 멀어지면, 이전의 상태로 돌아가기 위해 Memento 객체를 사용하고 있다.

이 글은 소프트웨어 설계의 기반이 되는 GoF의 디자인패턴에 대한 강의자료입니다. 완전한 실습을 위해 이 글에서 소개하는 클래스 다이어그램과 예제 코드는 완전하게 실행되도록 제공되지만, 상대적으로 예제 코드와 관련된 설명이 함축적으로 제공되고 있습니다. 이 글에 대해 궁금한 점이 있으면 댓글을 통해 남겨주시기 바랍니다.

[GoF] Mediator 패턴

패턴명칭

Mediator

필요한 상황

객체들 간의 상태가 또 다른 객체의 상태 변화에 영향을 줄때 각 객체의 상태 변화를 개별 객체가 읽어 처리하기 보다 하나의 중개자(Mediator)를 두어 처리할 수 있다.

예제 코드

날씨 정보에 따라 집안의 문, 창, 에어컨, 보일러의 가동을 자동화하는 예제이다. 비가 오면 창을 닫고 온도가 0도 보다 떨어지면 보일러를 켜고 에이컨을 끈다. 그리고 온도가 30가 넘어가면 에어컨을 켜고 보일러를 끈다. 또한 문, 창, 에이컨, 보일러의 상태가 변경되면 중개자에게 상태 변경을 알리고 중개자는 상태에 따라 각 객체를 제어하는데, 에이컨을 가동 상태로 변경하면 보일러를 끄고 문과 창을 닫는다. 그리고 보일러를 가동 상태로 변경하면 에이컨을 끄고 문과 창을 닫는다. 문이나 창이 열리는 상태로 변경되면 보일러와 에어컨을 끈다.

중개자는 Mediator 인터페이스로 구현해야 하며 다음과 같다.

package tstThread;

public interface Mediator {
	void itemsChanged();
}

Item은 앞서 언급한 문, 창, 에이컨, 보일러에 대한 구체적인 클래스가 반드시 구현해야할 추상 클래스로 다음과 같다.

package tstThread;

public abstract class Item {
	protected Mediator mediator;
	
	public Item(Mediator mediator) {
		this.mediator = mediator;
	}
}

중개자를 구현한 AutoHomeSystem 클래스는 다음과 같다.

package tstThread;

public class AutoHomeSystem implements Mediator {
	private Door door = new Door(this);
	private Window window = new Window(this);
	private CoolAircon aircon = new CoolAircon(this);
	private HeatBoiler boiler = new HeatBoiler(this);
	
	public void checkWeather(Weather weather) {
		if(weather.isRain()) {
			window.close();
		}
		
		int temperature = weather.getTemperature();
		if(temperature < 10) {
			aircon.off();
			boiler.on();
		} else if(temperature > 30) {
			aircon.on();
			boiler.off();
		} else {
			aircon.off();
			boiler.off();
		}
	}
	
	public void itemsChanged() {		
		if(aircon.isRunning()) {
			boiler.off();
			window.close();
			door.close();
		}
		
		if(boiler.isRunning()) {
			aircon.off();
			window.close();
			door.close();
		}
		
		if(!door.isClosed() || !window.isClosed()) {
			aircon.off();
			boiler.off();
		}
	}

	public void report() {
		System.out.println("\t" + door);
		System.out.println("\t" + window);
		System.out.println("\t" + aircon);
		System.out.println("\t" + boiler);
	}
}

위의 코드를 보면 중개자가 날씨와 문, 창, 에어컨, 보일러의 상태를 검사하여 다른 객체의 상태를 제어하고 있다. 날씨 클래스를 보자.

package tstThread;

import java.util.Random;

public class Weather {
	private boolean bRain = false;
	private int temperature = 0;
	private Random random = new Random();
	
	public void update() {
		bRain = random.nextInt(4) >= 3;
		temperature = (int)(random.nextDouble() * 100.0 - 50.0);
	}
	
	public boolean isRain() {
		return bRain;
	}
	
	public int getTemperature() {
		return temperature;
	}
	
	public String toString() {
		return "[ Rain: " + bRain + ", Temperature: " + temperature + " ]";
	}
}

이제 Item 추상 클래스를 구현하는 클래스들을 살펴보자. 먼저 Door 이다.

package tstThread;

public class Door extends Item {
	private boolean bClosed = false;
	
	public Door(Mediator mediator) {
		super(mediator);
	}

	public void open() {
		if(!bClosed) return;
		
		bClosed = false;
		mediator.itemsChanged();
	}
	
	public void close() {
		if(bClosed) return;
		
		bClosed = true;
		mediator.itemsChanged();
	}
	
	public boolean isClosed() {
		return bClosed;
	}
	
	public String toString() {
		StringBuilder sb = new StringBuilder();
		
		sb.append("DOOR: ");
		
		if(bClosed) {
			sb.append("closed");
		} else {
			sb.append("opened");
		}
		
		return sb.toString();
	}
}

다음은 Window 클래스이다.

package tstThread;

public class Window extends Item {
	private boolean bClosed = false;
	
	public Window(Mediator mediator) {
		super(mediator);
	}

	public void open() {
		if(!bClosed) return;
		
		bClosed = false;
		mediator.itemsChanged();
	}
	
	public void close() {
		if(bClosed) return;
		
		bClosed = true;
		mediator.itemsChanged();
	}
	
	public boolean isClosed() {
		return bClosed;
	}
	
	public String toString() {
		StringBuilder sb = new StringBuilder();
		
		sb.append("Window: ");
		
		if(bClosed) {
			sb.append("closed");
		} else {
			sb.append("opened");
		}
		
		return sb.toString();
	}
}

다음은 CoolAircor 클래스이다.

package tstThread;

public class CoolAircon extends Item {
	private boolean bOff = true;
	
	public CoolAircon(Mediator mediator) {
		super(mediator);
	}

	public void on() {
		if(!bOff) return;
		
		bOff = false;
		mediator.itemsChanged();
	}
	
	public void off() {
		if(bOff) return;
		
		bOff = true;
		mediator.itemsChanged();
	}
	
	public boolean isRunning() {
		return !bOff;
	}
	
	public String toString() {
		StringBuilder sb = new StringBuilder();
		
		sb.append("CoolAircon: ");
		
		if(bOff) {
			sb.append("off");
		} else {
			sb.append("on");
		}
		
		return sb.toString();
	}
}

다음은 HeatBoiler 클래스이다.

package tstThread;

public class HeatBoiler extends Item {
	private boolean bOff = true;
	
	public HeatBoiler(Mediator mediator) {
		super(mediator);
	}

	public void on() {
		if(!bOff) return;
		
		bOff = false;
		mediator.itemsChanged();
	}
	
	public void off() {
		if(bOff) return;
		
		bOff = true;
		mediator.itemsChanged();
	}
	
	public boolean isRunning() {
		return !bOff;
	}
	
	public String toString() {
		StringBuilder sb = new StringBuilder();
		
		sb.append("HeatBoiler: ");
		
		if(bOff) {
			sb.append("off");
		} else {
			sb.append("on");
		}
		
		return sb.toString();
	}
}

지금까지의 클래스를 사용하는 예제는 다음과 같다.

package tstThread;

public class Main {
	public static void main(String[] args) throws InterruptedException {
		Weather weather = new Weather();
		AutoHomeSystem home = new AutoHomeSystem();
		
		do {
			weather.update();
			System.out.println("Today's weather -> " + weather);
			
			home.checkWeather(weather);
			home.report();
			
			Thread.sleep(2000);
			System.out.println();
		} while(true);
	}
}

실행 결과는 다음과 같다.

Today's weather -> [ Rain: false, Temperature: -22 ]
	DOOR: closed
	Window: closed
	CoolAircon: off
	HeatBoiler: on

Today's weather -> [ Rain: false, Temperature: 40 ]
	DOOR: closed
	Window: closed
	CoolAircon: on
	HeatBoiler: off

Today's weather -> [ Rain: false, Temperature: -40 ]
	DOOR: closed
	Window: closed
	CoolAircon: off
	HeatBoiler: on

Today's weather -> [ Rain: false, Temperature: 41 ]
	DOOR: closed
	Window: closed
	CoolAircon: on
	HeatBoiler: off

Today's weather -> [ Rain: false, Temperature: 45 ]
	DOOR: closed
	Window: closed
	CoolAircon: on
	HeatBoiler: off
이 글은 소프트웨어 설계의 기반이 되는 GoF의 디자인패턴에 대한 강의자료입니다. 완전한 실습을 위해 이 글에서 소개하는 클래스 다이어그램과 예제 코드는 완전하게 실행되도록 제공되지만, 상대적으로 예제 코드와 관련된 설명이 함축적으로 제공되고 있습니다. 이 글에 대해 궁금한 점이 있으면 댓글을 통해 남겨주시기 바랍니다.