비디오 카드의 메모리의 용량은 적게는 32M에서 256M 정도 된다. 흔히 128M 정도의 카드가 많이 사용된다. 이 많은 비디오 카드의 메모리는 렌더링의 속도를 향상 시키기 위해서 3차원 그래픽 프로그램에서 사용된다. 하지만 3차원 그래픽 프로그램이 구동되지 않을 경우 대부분의 비디오 카드 메모리는 사용되지 않고 낭비된다. 예를들어 필자의 경우 해상도 1280×1024에서 32비트 색상을 사용하고 비디오 카드의 메모리는 128M이므로 128M에서 약 5M를 뺀 약 120M 정도의 비디오 메모리가 놀고 있는 셈이다.
그렇다면 이렇게 낭비되는 비디오 카드의 메모리를 3D 그래픽의 사용 목적이 아닌 일반 메모리처럼 사용할 수는 없을까? 게다가 비디오 카드의 메모리는 일반 메모리에 비해서 그 속도가 훨씬더 빠르다는 장점이 있지 않은가?
비디오 메모리를 사용하기 위해서는 당연히 비디오 메모리에 접근할 수 있어야 한다. 비디오 메모리에 접근하기 위한 API가 필요한데, 접근을 위한 특별한 API 라이브러리를 사용하는게 아니라 OpenGL과 DirectX의 API를 사용하면 되겠다. 여기서 필자에게 익숙한 OpenGL API를 사용하도록 하겠다.
비디오 메모리와 관련된 OpenGL API는 다음과 같다.
– glBindBuffer
– glBufferData
– glBufferSubData
– glDeleteBuffers
– glGenBuffers
– glMapBuffer
– glUnmapBuffer
위의 API는 ARB 군에 속해 있다가 OpenGL 1.5부터는 표준으로 안착되었다. 즉, OpenGL 1.5 이전에는 위의 함수명에다 접미사격으로 ARB를 붙여 사용해야 한다. 예를 들어서 glBindBuffer의 경우 glBindBufferARB 처럼 말이다. 물론 ARB의 경우는 Extension이므로 지원하는지의 여부를 먼저 확인해야 할 것이다. 확인을 위한 문자값은 GL_ARB_vertex_buffer_object이다.
각 함수의 내용에 대한 설명은 생략하고 사용하는 방법에 대해서만 살펴보겠다. 먼저 OpenGL을 초기화하고 현재 그래픽 카드가 지원하고 있는 OpenGL의 버전이 1.5 이상인지를 확인해야 한다. 여기서 한가지 문제점이 있는데, 그것은 바로 OpenGL의 초기화이다. OpenGL을 초기화하지 않으면 해당 API의 진입점을 찾지 못한다. 하지만 3D 기능을 사용하지도 않을 것인데, OpenGL을 초기화하해야한다는 것은 어쩌면 큰 부담이다. 특히 Console 프로그래밍과 같은 경우 렌더링 창에 대한 DC를 얻어와야 OpenGL을 초기화할 수 있는데, 이런 경우에 필자는 바탕화면의 DC를 사용하였다. 초기화를 위해 바탕화면의 DC를 사용하였을뿐, 실제로 무엇인가 렌더링하지는 않았기때문에 별 문제는 없으리라 본다.
어찌되었든 OpenGL을 초기화하고 OpenGL의 버전이 1.5 이상인 경우 위의 API의 진입점 포인트를 성공적으로 얻어왔다면 이제 사용하는 일만 남았다.
사용하는 방법은 정말 간단하다. 일반 메모리의 포인터를 얻어와 사용하는 방법과 유사하기 때문이다.
GLuint bufferID;

glGenBuffers(1, &bufferID);
glBindBuffer(GL_ARRAY_BUFFER, bufferID);
glBufferData(GL_ARRAY_BUFFER, sizeof(BYTE)*allocMemSize, NULL, GL_STATIC_DRAW);
BYTE *pBuffer = (BYTE *)glMapBuffer(GL_ARRAY_BUFFER, GL_READ_WRITE);
먼저 glGenBuffers를 사용하여 비디오 카드 메모리 버퍼의 ID를 생성하고 이 메모리 버퍼를 GL_ARRAY_BUFFER와 묶기 위해 glBindBuffer 함수를 사용한다. 그 후에 glBufferData를 사용하여 실제 비디오 메모리를 원하는 크기만큼 할당하는데 이 경우 가장 빠른 속도를 위해 GL_STATIC_DRAW를 사용하였다. 할당할 메모리의 크기는 자신이 사용하는 비디오 카드의 메모리의 크기를 잘 고려해서 지정하기 바란다. 여기까지 성공하였다면 할당 받은 비디오 카드의 메모리를 일반 메모리의 포인터처럼 사용하기 위해 메모리 주소값으로 Mapping 시키기 위해 glMapBuffer함수를 사용하여 포인터 주소를 얻어 온다. 바로 이 포인터 주소를 사용해서 일반 메모리와 똑같이 사용할 수 있는 것이다.
for(size_t i=0; i
위의 코드는 실제로 비디오 카드의 메모리를 마치 일반 포인터의 개념처럼 사용하는 예를 든 것이다.
이제는 이렇게 사용한 비디오 카드의 메모리를 해제시키는 방법은 다음 코드와 같다.

glUnmapBuffer(GL_ARRAY_BUFFER);
glDeleteBuffers(1, &bufferID);
필자가 시험삼아 10M의 메모리를 비디오 카드에 할당해 사용하는 방법과 일반 메모리에 new 연산자를 이용해 힙에 할당해서 사용하는 방법의 속도 차이를 비교해본 결과 약 3배정도의 속도 향상이 있음을 발견했다.
끝으로 이런 비디오 카드의 메모리의 속도의 장점을 잘활용한다면 빠른 속도를 요구하는 코드에 더욱 좋은 성능 향상을 꾀할 수 있을 것이다. 또한 비디오 메모리의 경우 일반 메모리에 비해 외부의 어플리케이션으로부터의 메모리 해킹이 어렵기 때문에 보안적인 면에서도 좋은 이점이 있을 것으로 생각된다.


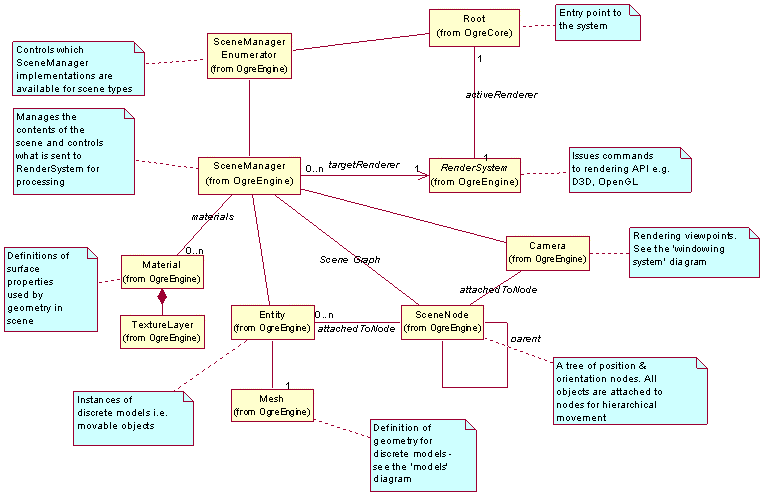 위는 Ogre의 핵심 클래스의 관계도입니다. 간단해 보이기는 하지만 다른 부수적인 것들이 붙으면 매우 복잡하겠지요. Ogre를 분석하는 방법은 Ogre 사이트에서 제공하는 Tutorial과 Demo 소스를 분석하는 방식으로 하려 합니다. 제 스스로에게 건투를 빕니다.