CSS의 @property 사용예

자주 사용하지는 않지만 CSS에도 변수를 정의해 재활용할 수 있는 문법을 제공하는데 :root를 정의하고 이 안에 원하는 값을 넣어 정의하곤 했습니다. CSS에 대한 더 높은 수준의 경험 많은 개발자는 이런 CSS에서의 변수 정의를 반드시 사용해야 하는 상황을 만나게 됩니다. 이런 CSS에서의 변수를 정의하는 좀더 표준화된 문법이 있는데 그것은 @property입니다. 표준화의 의미는 엄격함이라는 조건을 달아 실수를 줄여 견고한 코드를 작성하도록 하는 장치와 같습니다.

여튼 저는 –a라는 이름의 변수(프로퍼티)를 다음처럼 정의했습니다.

@property --a {
  syntax: "<angle>"; /* https://developer.mozilla.org/en-US/docs/Web/CSS/@property/syntax */
  inherits: false;  
  initial-value: 0turn;
}

프로퍼티가 가지는 타입(syntax)와 초기값을 지정하고 있습니다. 그럼 이 프로퍼티를 사용하는 코드를 보면 다음과 같습니다.

.box::before {
  content: '';
  position: absolute;
  inset: 0;
  background: repeating-conic-gradient(from var(--a), #f00, #ff0, #fff, #0ff, #f0f, #f00);
  border-radius: 25px;
  animation: rotating 4s linear infinite;
}

@keyframes rotating {
  0% {
    --a: 0turn;
  }
  100% {
    --a: -4turn;
  }
}

명확하고 직관적입니다.

실제 위의 코드가 적용한 예제 코드는 다음과 같습니다.

<!DOCTYPE html>
<html lang="en">
<head>
  <meta charset="UTF-8">
  <meta name="viewport" content="width=device-width, initial-scale=1.0">
  <title>Document</title>
  <style>
    * {
      margin: 0;
      padding: 0;
      box-sizing: border-box;
    }

    body {
      display: flex;
      justify-content: center;
      align-items: center;
      min-height: 100vh;
      background-color: #222;
    }

    .box {
      position: relative;
      width: 400px;
      height: 300px;
    }

    .box span {
      color: white;
      display: flex;
      align-items: center;
      justify-content: center;
      font-size: 2.5rem;
      font-weight: bold;
    }

    .box::before {
      content: '';
      position: absolute;
      inset: 0;
      background: repeating-conic-gradient(from var(--a), #f00, #ff0, #fff, #0ff, #f0f, #f00);
      border-radius: 25px;
      animation: rotating 4s linear infinite;
    }

    .box::after {
      content: '';
      position: absolute;
      inset: 0;
      background: repeating-conic-gradient(from var(--a), #f00, #ff0, #fff, #0ff, #f0f, #f00);
      border-radius: 25px;
      animation: rotating 4s linear infinite;
      filter: blur(40px);
      opacity: 0.75;
    }

    .box span {
      position: absolute;
      inset: 4px;
      background: #222;
      border-radius: 22px;
      z-index: 1;
    }

    @property --a {
      syntax: '<angle>'; /* https://developer.mozilla.org/en-US/docs/Web/CSS/@property/syntax */
      inherits: false;  
      initial-value: 0turn;
    }

    @keyframes rotating {
      0% {
        --a: 0turn;
      }
      100% {
        --a: -4turn;
      }
    }
  </style>
</head>
<body>
  <div class="box">
    <span>GIS DEVELOPER</span>
  </div>
</body>
</html>

결과는 다음과 같습니다.

DOM에 대한 표시 여부 감시(IntersectionObserver)

먼저 코드는 다음과 같습니다.

import './style-intersectionObserver.css'

const divApp = document.querySelector("#app")

if(divApp) {
  for(let i=0; i<20; i++) {
    const div = document.createElement("div")
    div.innerHTML = (i+1).toString()
    divApp.append(div)
  }
  
  const observer = new IntersectionObserver((entries) => {
    entries.forEach((entry) => {
      if(entry.isIntersecting) {
        entry.target.classList.add("visible")
      } else {
        entry.target.classList.remove("visible")
      }
    })
  }, {
    threshold: 0
  })

  const divList = divApp.querySelectorAll("div")
  divList?.forEach((div) => observer.observe(div))
}

스타일은 다음과 같구요.

body {
  margin: 0;
}

#app {
  overflow-y: auto;
  position: fixed;
  background-color: rgb(45, 46, 47);
  background-image: 
    linear-gradient(to right, rgb(35, 36, 37) 1px, transparent 1px), 
    linear-gradient(to bottom, rgb(35, 36, 37) 1px, transparent 1px);
  background-size: 32px 32px;

  width: 100%;
  height: 100vh;
}

#app div {
  color: white;
  font-size: 5rem;
  display: flex;
  align-items: center;
  justify-content: center;
  margin: 8px auto;
  height: 160px;
  width: 160px;
  border-radius: 10%;
  background-color: black;
  border: 2.5px solid white;
  transition: all 0.5s ease-in-out;
  transform: rotate(-90deg) scale(0.1);
  opacity: 0;
}

#app div.visible {
  transform: rotate(0deg) scale(1);
  opacity: 1;
}

실행 결과는 다음과 같습니다.

인문학적 주소 DB

기록은 남겨야겠고.. 그렇다고 딱히 머라 정할 제목은 만만치 않아 “인문학적”이라는 어디에도 붙여 써먹어도 멋진 단어를 사용했습니다.

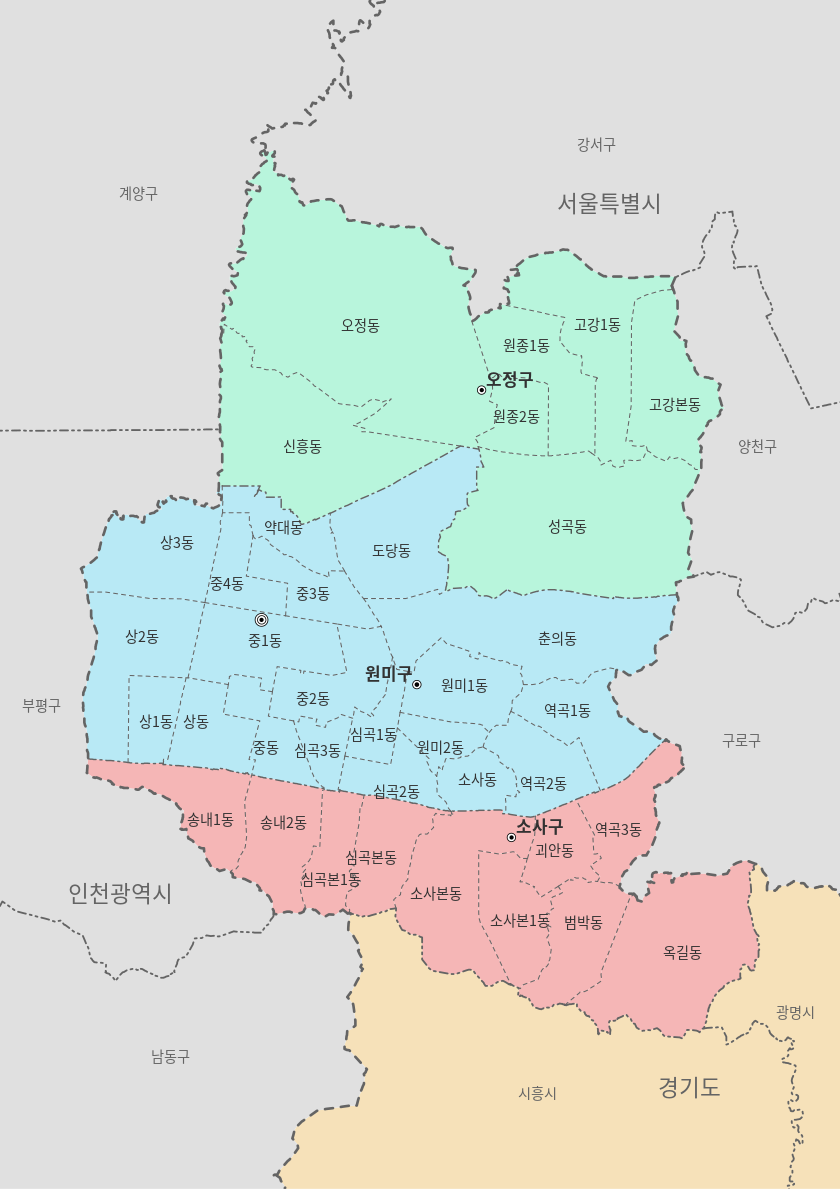
경기도에는 부천시가 있습니다. (아래 이미지 출처 : 위키백과)

부천시는 분류상 시군구(sig)입니다. 실제 시스템적 DB화는 부천시 하나입니다. 일반적으로 사람에게 의미있는 정보에 대해 좀더 시스템적으로 처리하기 위해 코드를 부여하는데.. 오직 “부천시”에만 코드값이 할당되어 있습니다. 그런데 우리들은 이 부천시를 위의 그림처럼 오정구, 원미구, 소사구로 다시 구분해서 실생활에 활용합니다. 구분할 필요가 전혀 없는데도 말입니다. 결국 “부천시”에 대해서 동일한 코드값을 갖지만 “부천시 오정구”, “부천시 원미구”, “부천시 소사구”를 DB에 저장할 필요가 있습니다.

여튼 서론이 다소 장황했지만 시스템은 사람이 사용하는 것이므로 부천시에 대한 각 구는 반드시 구분해서 DB화를 해야 한다는 것입니다.

postgreSQL 테이블스페이스 생성

DB 용량이 늘어나게 되면 물리적인 저장장치를 분리해서 DB를 나눠 저장하는 경우가 생기게 되는데 이때 테이블 스페이스(Table Space)라는 단위가 사용됩니다. 참고로 테이블 스페이스는 오라클이나 포스트그래스큐엘 등과 같은 엔터프라이즈 DBMS에서만 지원하는 경우가 많습니다.

먼저 저장장치의 용량을 확인할 필요가 있습니다.

df -h

그리고 테이블스페이스로 사용할 디렉토리를 생성해야 하구요.

mkdir pg_tablespace_geocode2
chown postgres pg_tablespace_geocode2

psql을 통해 다음처럼 테이블 스페이스를 생성할 수 있습니다. 참고로 psql을 실행하기 위해서는 postgres 사용자의 권한을 필요하며 su – postgres와 같은 명령이 필요합니다.

create tablespace ts_geocode2 location '/usr/GeoService-Xr/webHome/user-files/pg_tablespace_geocode2';

테이블 스페이스를 확인하는 명령은 다음과 같습니다.

\db

특정 테이블 스페이스에 DB를 생성하는 명령은 다음과 같습니다.

CREATE DATABASE gis_20240219 WITH TABLESPACE = ts_geocode2;