[GoF] Mediator 패턴

패턴명칭

Mediator

필요한 상황

객체들 간의 상태가 또 다른 객체의 상태 변화에 영향을 줄때 각 객체의 상태 변화를 개별 객체가 읽어 처리하기 보다 하나의 중개자(Mediator)를 두어 처리할 수 있다.

예제 코드

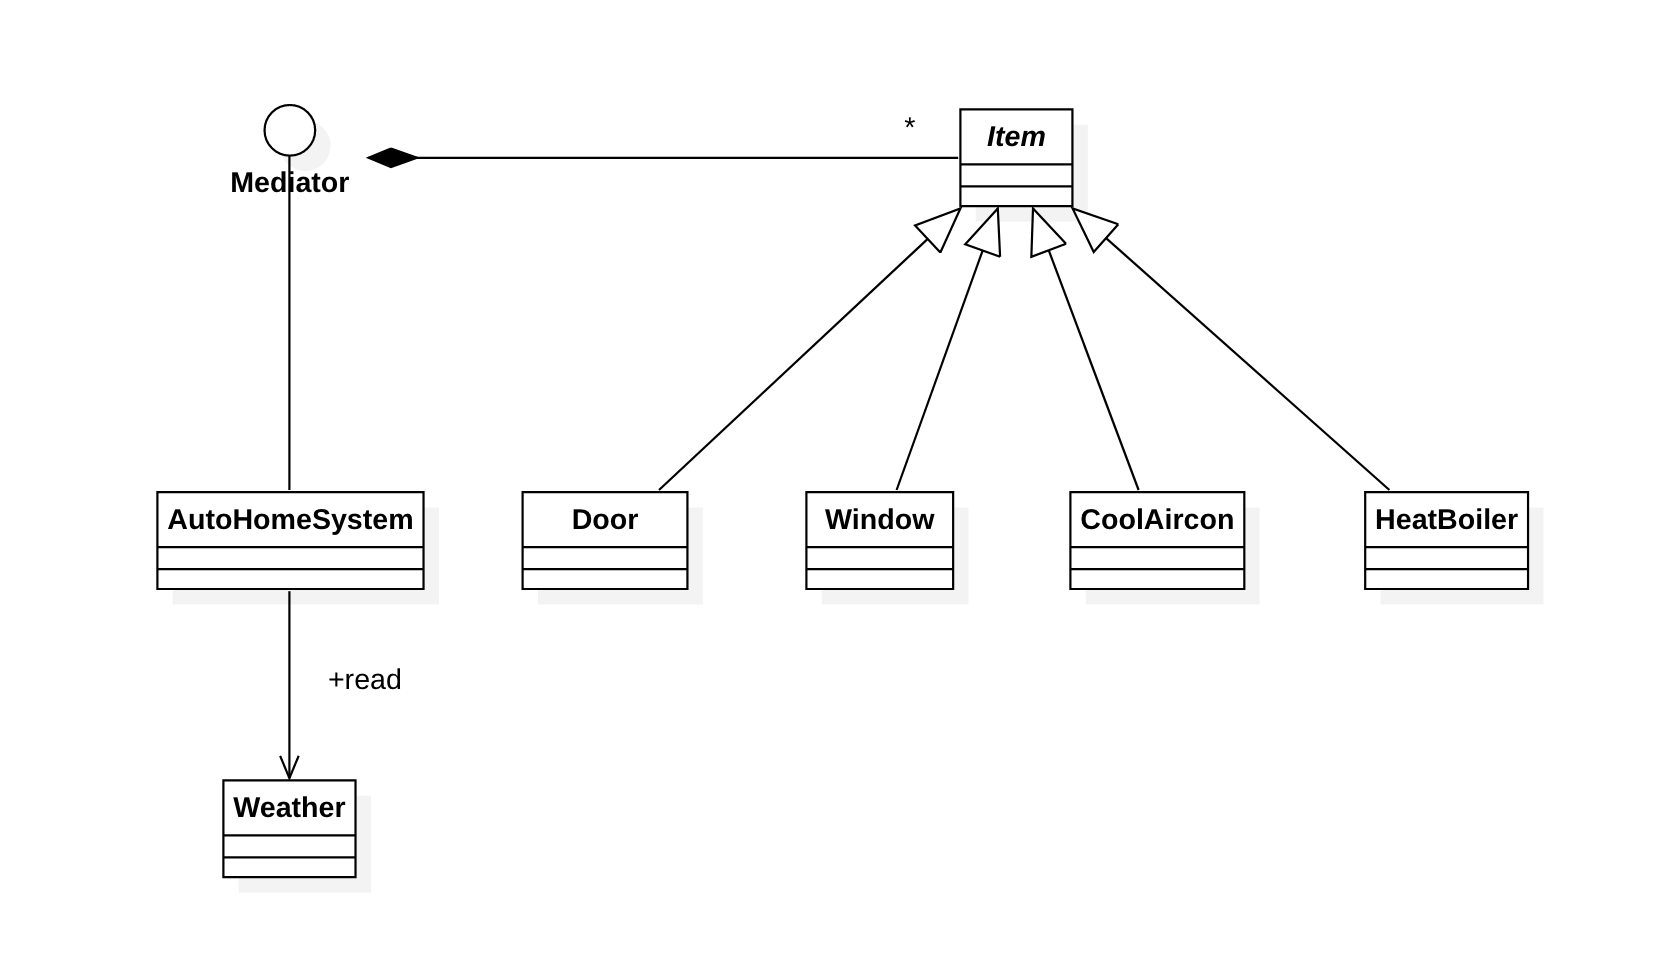
날씨 정보에 따라 집안의 문, 창, 에어컨, 보일러의 가동을 자동화하는 예제이다. 비가 오면 창을 닫고 온도가 0도 보다 떨어지면 보일러를 켜고 에이컨을 끈다. 그리고 온도가 30가 넘어가면 에어컨을 켜고 보일러를 끈다. 또한 문, 창, 에이컨, 보일러의 상태가 변경되면 중개자에게 상태 변경을 알리고 중개자는 상태에 따라 각 객체를 제어하는데, 에이컨을 가동 상태로 변경하면 보일러를 끄고 문과 창을 닫는다. 그리고 보일러를 가동 상태로 변경하면 에이컨을 끄고 문과 창을 닫는다. 문이나 창이 열리는 상태로 변경되면 보일러와 에어컨을 끈다.

중개자는 Mediator 인터페이스로 구현해야 하며 다음과 같다.

package tstThread;

public interface Mediator {
	void itemsChanged();
}

Item은 앞서 언급한 문, 창, 에이컨, 보일러에 대한 구체적인 클래스가 반드시 구현해야할 추상 클래스로 다음과 같다.

package tstThread;

public abstract class Item {
	protected Mediator mediator;
	
	public Item(Mediator mediator) {
		this.mediator = mediator;
	}
}

중개자를 구현한 AutoHomeSystem 클래스는 다음과 같다.

package tstThread;

public class AutoHomeSystem implements Mediator {
	private Door door = new Door(this);
	private Window window = new Window(this);
	private CoolAircon aircon = new CoolAircon(this);
	private HeatBoiler boiler = new HeatBoiler(this);
	
	public void checkWeather(Weather weather) {
		if(weather.isRain()) {
			window.close();
		}
		
		int temperature = weather.getTemperature();
		if(temperature < 10) {
			aircon.off();
			boiler.on();
		} else if(temperature > 30) {
			aircon.on();
			boiler.off();
		} else {
			aircon.off();
			boiler.off();
		}
	}
	
	public void itemsChanged() {		
		if(aircon.isRunning()) {
			boiler.off();
			window.close();
			door.close();
		}
		
		if(boiler.isRunning()) {
			aircon.off();
			window.close();
			door.close();
		}
		
		if(!door.isClosed() || !window.isClosed()) {
			aircon.off();
			boiler.off();
		}
	}

	public void report() {
		System.out.println("\t" + door);
		System.out.println("\t" + window);
		System.out.println("\t" + aircon);
		System.out.println("\t" + boiler);
	}
}

위의 코드를 보면 중개자가 날씨와 문, 창, 에어컨, 보일러의 상태를 검사하여 다른 객체의 상태를 제어하고 있다. 날씨 클래스를 보자.

package tstThread;

import java.util.Random;

public class Weather {
	private boolean bRain = false;
	private int temperature = 0;
	private Random random = new Random();
	
	public void update() {
		bRain = random.nextInt(4) >= 3;
		temperature = (int)(random.nextDouble() * 100.0 - 50.0);
	}
	
	public boolean isRain() {
		return bRain;
	}
	
	public int getTemperature() {
		return temperature;
	}
	
	public String toString() {
		return "[ Rain: " + bRain + ", Temperature: " + temperature + " ]";
	}
}

이제 Item 추상 클래스를 구현하는 클래스들을 살펴보자. 먼저 Door 이다.

package tstThread;

public class Door extends Item {
	private boolean bClosed = false;
	
	public Door(Mediator mediator) {
		super(mediator);
	}

	public void open() {
		if(!bClosed) return;
		
		bClosed = false;
		mediator.itemsChanged();
	}
	
	public void close() {
		if(bClosed) return;
		
		bClosed = true;
		mediator.itemsChanged();
	}
	
	public boolean isClosed() {
		return bClosed;
	}
	
	public String toString() {
		StringBuilder sb = new StringBuilder();
		
		sb.append("DOOR: ");
		
		if(bClosed) {
			sb.append("closed");
		} else {
			sb.append("opened");
		}
		
		return sb.toString();
	}
}

다음은 Window 클래스이다.

package tstThread;

public class Window extends Item {
	private boolean bClosed = false;
	
	public Window(Mediator mediator) {
		super(mediator);
	}

	public void open() {
		if(!bClosed) return;
		
		bClosed = false;
		mediator.itemsChanged();
	}
	
	public void close() {
		if(bClosed) return;
		
		bClosed = true;
		mediator.itemsChanged();
	}
	
	public boolean isClosed() {
		return bClosed;
	}
	
	public String toString() {
		StringBuilder sb = new StringBuilder();
		
		sb.append("Window: ");
		
		if(bClosed) {
			sb.append("closed");
		} else {
			sb.append("opened");
		}
		
		return sb.toString();
	}
}

다음은 CoolAircor 클래스이다.

package tstThread;

public class CoolAircon extends Item {
	private boolean bOff = true;
	
	public CoolAircon(Mediator mediator) {
		super(mediator);
	}

	public void on() {
		if(!bOff) return;
		
		bOff = false;
		mediator.itemsChanged();
	}
	
	public void off() {
		if(bOff) return;
		
		bOff = true;
		mediator.itemsChanged();
	}
	
	public boolean isRunning() {
		return !bOff;
	}
	
	public String toString() {
		StringBuilder sb = new StringBuilder();
		
		sb.append("CoolAircon: ");
		
		if(bOff) {
			sb.append("off");
		} else {
			sb.append("on");
		}
		
		return sb.toString();
	}
}

다음은 HeatBoiler 클래스이다.

package tstThread;

public class HeatBoiler extends Item {
	private boolean bOff = true;
	
	public HeatBoiler(Mediator mediator) {
		super(mediator);
	}

	public void on() {
		if(!bOff) return;
		
		bOff = false;
		mediator.itemsChanged();
	}
	
	public void off() {
		if(bOff) return;
		
		bOff = true;
		mediator.itemsChanged();
	}
	
	public boolean isRunning() {
		return !bOff;
	}
	
	public String toString() {
		StringBuilder sb = new StringBuilder();
		
		sb.append("HeatBoiler: ");
		
		if(bOff) {
			sb.append("off");
		} else {
			sb.append("on");
		}
		
		return sb.toString();
	}
}

지금까지의 클래스를 사용하는 예제는 다음과 같다.

package tstThread;

public class Main {
	public static void main(String[] args) throws InterruptedException {
		Weather weather = new Weather();
		AutoHomeSystem home = new AutoHomeSystem();
		
		do {
			weather.update();
			System.out.println("Today's weather -> " + weather);
			
			home.checkWeather(weather);
			home.report();
			
			Thread.sleep(2000);
			System.out.println();
		} while(true);
	}
}

실행 결과는 다음과 같다.

Today's weather -> [ Rain: false, Temperature: -22 ]
	DOOR: closed
	Window: closed
	CoolAircon: off
	HeatBoiler: on

Today's weather -> [ Rain: false, Temperature: 40 ]
	DOOR: closed
	Window: closed
	CoolAircon: on
	HeatBoiler: off

Today's weather -> [ Rain: false, Temperature: -40 ]
	DOOR: closed
	Window: closed
	CoolAircon: off
	HeatBoiler: on

Today's weather -> [ Rain: false, Temperature: 41 ]
	DOOR: closed
	Window: closed
	CoolAircon: on
	HeatBoiler: off

Today's weather -> [ Rain: false, Temperature: 45 ]
	DOOR: closed
	Window: closed
	CoolAircon: on
	HeatBoiler: off
이 글은 소프트웨어 설계의 기반이 되는 GoF의 디자인패턴에 대한 강의자료입니다. 완전한 실습을 위해 이 글에서 소개하는 클래스 다이어그램과 예제 코드는 완전하게 실행되도록 제공되지만, 상대적으로 예제 코드와 관련된 설명이 함축적으로 제공되고 있습니다. 이 글에 대해 궁금한 점이 있으면 댓글을 통해 남겨주시기 바랍니다.

[GoF] Observer 패턴

패턴명칭

Observer

필요한 상황

상태가 변경되면 그 상태 변경에 따라 반응하는 구조를 구현하기 위한 패턴이다.

예제 코드

주사위 게임을 예제로 한다. DicePlay는 주사위를 던지는 기능을 실행한다. Player는 주사위 게임에 참여하는 사람들이다. Player를 상속받는 OddBettingPlayer는 홀수에 배팅을 거는 사람이고, EvenBettingPlayer는 짝수에 배팅을 거는 사람이다. 주사위 게임에 참여하면, 주사위가 던져질때 자동으로 게임에 참여한 사람들의 승리 여부를 즉시 확인이 가능하다. DicePlay 클래스는 다음과 같다.

package tstThread;

import java.util.Iterator;
import java.util.LinkedList;
import java.util.Random;

public class DicePlay {
	private LinkedList<Player> players = new LinkedList<Player>();
	private Random random = new Random();
	
	public void addPlayer(Player player) {
		players.add(player);
	}
	
	public void play() {
		int v = random.nextInt(6) + 1;
		
		System.out.println("Dice Number: " + v);
		
		Iterator<Player> iter = players.iterator();
		while(iter.hasNext()) {
			iter.next().update(v);
		}
	}
}

Player의 코드는 다음과 같다.

package tstThread;

public abstract class Player {
	private String name;
	
	public Player(String name) {
		this.name = name;
	}
	
	public String getName() {
		return name;
	}
	
	public abstract void update(int n);
}

Player를 상속받는 OddBettingPlayer 클래스는 다음과 같다.

package tstThread;

public class OddBettingPlayer extends Player {

	public OddBettingPlayer(String name) {
		super(name);
	}

	@Override
	public void update(int n) {
		if(n % 2 == 1) {
			System.out.println(getName() + " win!");
		}
	}
}

Player를 상속받는 EvenBettingPlayer 클래스는 다음과 같다.

package tstThread;

public class EvenBettingPlayer extends Player {

	public EvenBettingPlayer(String name) {
		super(name);
	}

	@Override
	public void update(int n) {
		if(n % 2 == 0) {
			System.out.println(getName() + " win!");
		}
	}
}

위의 클래스를 사용한 예제 코드는 다음과 같다.

package tstThread;

public class Main {
	public static void main(String[] args) {
		DicePlay dicePlay = new DicePlay();
		
		Player player1 = new EvenBettingPlayer("Jane");
		Player player2 = new OddBettingPlayer("Suji");
		
		dicePlay.addPlayer(player1);
		dicePlay.addPlayer(player2);
		
		for(int i=0; i<10; i++) {
			dicePlay.play();
			System.out.println();
		}		
	}
}

실행결과는 다음과 같다.

Dice Number: 6
Jane win!

Dice Number: 1
Suji win!

Dice Number: 5
Suji win!

Dice Number: 6
Jane win!

Dice Number: 6
Jane win!

Dice Number: 5
Suji win!

Dice Number: 2
Jane win!

Dice Number: 5
Suji win!

Dice Number: 3
Suji win!

Dice Number: 2
Jane win!
이 글은 소프트웨어 설계의 기반이 되는 GoF의 디자인패턴에 대한 강의자료입니다. 완전한 실습을 위해 이 글에서 소개하는 클래스 다이어그램과 예제 코드는 완전하게 실행되도록 제공되지만, 상대적으로 예제 코드와 관련된 설명이 함축적으로 제공되고 있습니다. 이 글에 대해 궁금한 점이 있으면 댓글을 통해 남겨주시기 바랍니다.

[GoF] Factory Method 패턴

패턴명칭

Factory Method

필요한 상황

객체의 생성에 대해 Template 패턴을 활용한 경우이다. 객체를 안전하고 완벽하게 생성하기 위한 방법을 상위 클래스에서 정해 놓고, 그 방법에 대한 구체적인 구현은 하위 클래스에서 정의한다.

예제 코드

다양한 형태의 도형을 생성을 위해 필요한 절차를 Factory 클래스에 정의해 놓고, 각 절차에 대한 구체적인 구현은 SyncFactory 클래스에서 정의한다. 먼저 Factory 클래스는 다음과 같다.

package tstThread;

public abstract class Factory {
	public Shape create(Shape newShape) {
		if(register(newShape)) {
			if(uploadToServer(newShape)) {
				return newShape;
			}
		}
		
		return null;
	}
	
	protected abstract boolean register(Shape shape);
	protected abstract boolean uploadToServer(Shape shape);
}

먼저 생성된 초벌 객체를 인자로 받아 등록하고, 서버로 해당 도형을 전송까지 성공하면 처리된 객체를 반환하지만 절차중 하나라도 실패하면 null을 반환한다. 초벌 객체의 생성은 인자로 받았으나 create 매서드 내부에서 수행해도 된다. 완전한 객체 생성을 위한 절차를 구체적으로 구현한 SyncFactory 클래스는 다음과 같다.

package tstThread;

import java.util.HashMap;

public class SyncFactory extends Factory {
	private HashMap<String, Shape> shapes = new HashMap<String, Shape>();

	@Override
	protected boolean register(Shape shape) {
		String name = shape.getName();
		
		if(!shapes.containsKey(name)) {
			shapes.put(name, shape);
			System.out.println("registering shape(" + shape + ") is successed.");
			return true;
		}
		
		System.out.println("registering shape(" + shape + ") is failed.");
		return false;
	}

	@Override
	protected boolean uploadToServer(Shape shape) {
		try {
			Thread.sleep(1000);
			System.out.println("uploading shape(" + shape + ") is successed.");
			return true;
		} catch(Exception e) {
			System.out.println("uploading shape(" + shape + ") is failed.");
			return false;
		}		
	}
}

다음은 생성할 도형에 대한 Shape 클래스이다.

package tstThread;

public abstract class Shape {
	protected String name;
	
	public Shape(String name) {
		this.name = name;
	}
	
	public String getName() {
		return name;
	}
	
	public String toString() {
		return name;
	}
	
	public abstract void draw();
}

이 Shape 클래스를 구현한 구체적인 파생 클래스 중 Circle 클래스는 다음과 같다.

package tstThread;

public class Circle extends Shape {
	private int radius;
	
	public Circle(String name, int radius) {
		super(name);
		this.radius = radius;
	}

	@Override
	public void draw() {
		System.out.println("Circle(" + name + ") draw : radis = " + radius);
	}
}

Box 클래스는 다음과 같다.

package tstThread;

public class Box extends Shape {
	private int width;
	private int height;
	
	public Box(String name, int width, int height) {
		super(name);
		this.width = width;
		this.height = height;
	}

	@Override
	public void draw() {
		System.out.println("Circle(" + name + ") draw : width = " + width + ", height = " + height);
	}
}

지금까지 만든 클래스를 사용하는 코드는 다음과 같다.

package tstThread;

public class Main {
	public static void main(String[] args) {
		Factory factory = new SyncFactory();
		Shape shape;
		
		shape = factory.create(new Circle("SHAPE1", 10));
		if(shape != null) shape.draw();
		System.out.println();
		
		shape = factory.create(new Box("SHAPE2", 10, 20));
		if(shape != null) shape.draw();
		System.out.println();
		
		shape = factory.create(new Box("SHAPE1", 5, 10));
		if(shape != null) shape.draw();
		System.out.println();
	}
}

실행결과는 다음과 같다.

registering shape(SHAPE1) is successed.
uploading shape(SHAPE1) is successed.
Circle(SHAPE1) draw : radis = 10

registering shape(SHAPE2) is successed.
uploading shape(SHAPE2) is successed.
Circle(SHAPE2) draw : width = 10, height = 20

registering shape(SHAPE1) is failed.

총 3개의 도형을 생성했는데, 마지막 도형의 경우 이미 동일한 이름(name)을 갖고 도형이 먼저 생성되어져 있어 실패하게 된다.

이 글은 소프트웨어 설계의 기반이 되는 GoF의 디자인패턴에 대한 강의자료입니다. 완전한 실습을 위해 이 글에서 소개하는 클래스 다이어그램과 예제 코드는 완전하게 실행되도록 제공되지만, 상대적으로 예제 코드와 관련된 설명이 함축적으로 제공되고 있습니다. 이 글에 대해 궁금한 점이 있으면 댓글을 통해 남겨주시기 바랍니다.

[GoF] Composite 패턴

패턴명칭

Composite

필요한 상황

배열이나 리스트 등과 같은 컨테이너와 컨테이너를 구성하는 구성 요소를 동일하게 처리하기 위한 패턴이다. 컨테이너와 구성 요소는 동일하게 처리되므로 컨테이너 안에는 또 다른 컨테이너를 포함할 수 있다.

예제 코드

우리가 흔히 접하는 폴더와 파일 개념이다. 폴더와 파일을 동일한 개념으로 다루기 위해 Unit이라는 추상 클래스를 두고, 폴더와 파일은 이 Unit을 상속받아 처리한다. Folder 클래스는 다시 여러개의 폴더와 파일을 담을 수 있으므로 Unit을 여러개 담을 수 있도록 한다. 먼저 Unit 클래스는 다음과 같다.

package tstThread;

public abstract class Unit {
	private String name;
	
	public Unit(String name) {
		this.name = name;
	}
	
	public String getName() {
		return name;
	}
	
	public String toString() {
		return name + "(" + getSize() + ")";
	}
	
	public abstract int getSize();
}

이 Unit 클래스를 상속받는 File 클래스는 다음과 같다.

package tstThread;

public class File extends Unit {
	private int size;
	
	public File(String name, int size) {
		super(name);
		this.size = size;
	}

	@Override
	public int getSize() {
		return size;
	}
}

Folder 클래스는 다음과 같다.

package tstThread;

import java.util.Iterator;
import java.util.LinkedList;

public class Folder extends Unit {
	private LinkedList<Unit> units = new LinkedList<Unit>();

	public Folder(String name) {
		super(name);
	}

	@Override
	public int getSize() {
		int size = 0;
		Iterator<Unit> it = units.iterator();
		
		while(it.hasNext()) {
			Unit unit = it.next();
			size += unit.getSize();
		}
		
		return size;
	}

	public boolean add(Unit unit) {
		units.add(unit);
		return true;
	}
	
	private void list(String indent, Unit unit) {
		if(unit instanceof File) {
			System.out.println(indent + unit);
		} else {
			Folder dir = (Folder)unit;
			Iterator<Unit> it = dir.units.iterator();
			System.out.println(indent + "+" + unit);
			while(it.hasNext()) {
				list(indent + "    ", it.next());
			}			
		}
	}
	
	public void list() {
		list("", this);
	}
}

이 클래스들을 사용하는 코드는 다음과 같다.

package tstThread;

public class Main {
	public static void main(String[] args) {
		Folder root = new Folder("root");
		root.add(new File("a.txt", 1000));
		root.add(new File("b.txt", 2000));
		
		Folder sub1 = new Folder("sub1");
		root.add(sub1);
		
		sub1.add(new File("sa.txt", 100));
		sub1.add(new File("sb.txt", 4000));
		
		Folder sub2 = new Folder("sub2");
		root.add(sub2);
		
		sub2.add(new File("SA.txt", 250));
		sub2.add(new File("SB.txt", 340));
		
		root.list();
	}
}

위 코드의 실행 결과는 다음과 같다.

+root(7690)
    a.txt(1000)
    b.txt(2000)
    +sub1(4100)
        sa.txt(100)
        sb.txt(4000)
    +sub2(590)
        SA.txt(250)
        SB.txt(340)

Composite 패턴은 집합과 그 구성요소를 동일하게 처리하기 위해 재귀적인 처리가 필수이다.

이 글은 소프트웨어 설계의 기반이 되는 GoF의 디자인패턴에 대한 강의자료입니다. 완전한 실습을 위해 이 글에서 소개하는 클래스 다이어그램과 예제 코드는 완전하게 실행되도록 제공되지만, 상대적으로 예제 코드와 관련된 설명이 함축적으로 제공되고 있습니다. 이 글에 대해 궁금한 점이 있으면 댓글을 통해 남겨주시기 바랍니다.